Podcast: Play in new window | Download (Duration: 21:44 — 30.7MB) | Embed
Subscribe: Spotify | Amazon Music | Email | TuneIn | Deezer | RSS | More
The Easiest Way to Set Up an Airtable Content Calendar for Social Media
Are you thinking of using an Airtable Content Calendar to help you plan your social media content?
If yes, then this is the Airtable tutorial that you need.
A few years ago I came across Airtable and I remember thinking that it looks so flexible.
I even felt a little bit apprehensive because I thought that it will take me a long time to learn how to use it.
Looking back I can see why many entrepreneurs and side hustlers may think twice about using Airtable for social media.
While it does look like a regular spreadsheet, Airtable has so much more flexibility and charm built in.
Imagine having a tool that feels pretty much like play doh when you want to customise it.
In this post, you will learn how to use Airtable as a content calendar for social media.
You will also learn how to make it your own by mastering as many features as possible so that it is customised to your needs.

Airtable Background
If you are brand new to Airtable you can think of it as a collaboration tool that has a combination of spreadsheet and database features.
Airtable was founded back in 2012 by three people; Howie Liu, Andrew Ofstad, and Emmett Nicholas.
Since then they have managed to go through several funding rounds raising a total of $347.6 million between 2015 and 2020.
Headquartered in San Francisco, California, USA, Airtable is used by over 200,000 companies globally.
With the help of Zapier, you can integrate Airtable with over 450 other applications including Instagram.
According to co-founder Howie Liu, they are not trying to make a replacement for Google Sheets or Excel.
They are building the next Apple or Microsoft which he says is the next billion dollar opportunity.
You can take a look at Howie’s video here.
Airtable Components
While reading up about the background of Airtable, I noticed that Howie mentioned that it has Lego-like features.
To help you appreciate this even more let me introduce you to the building blocks of Airtable.
In total, Airtable is made up of 6 components. These include;
- Workspaces
- Bases
- Tables
- Fields
- Views
- Records
1. Workspaces
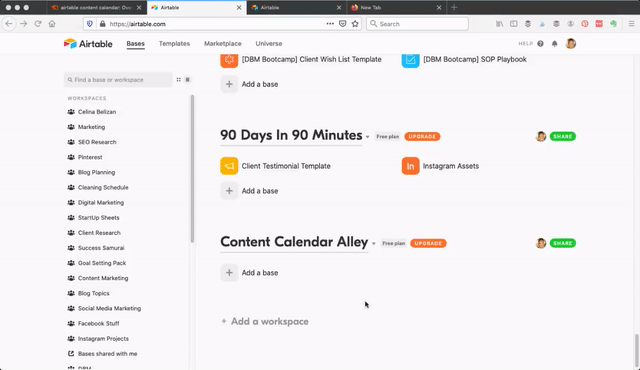
You can think of a workspace as a home for one of your departments or if you have clients, it is a place to store the bases related to a specific client.
2. Bases
Each workspace can have an unlimited number of bases. The only restriction on the free plan is the total number of records per base which is 1200.
You can think of each base as a group of related tables nested together.
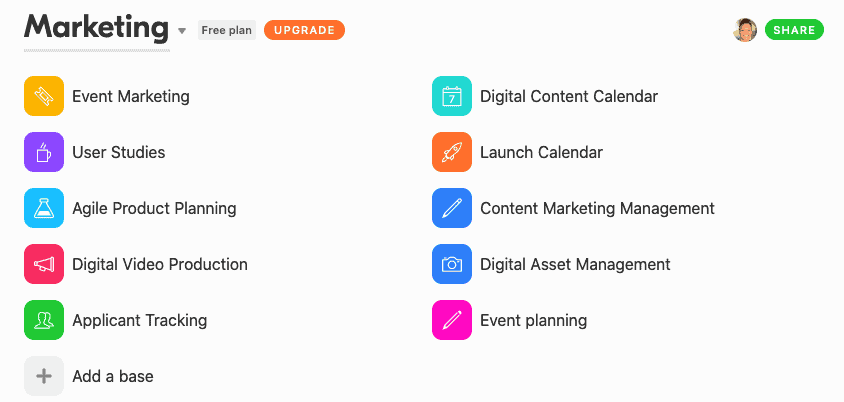
As you can see in the screenshot above all the bases related to marketing are stored in the marketing workspace.
3. Tables
This is where the terminology becomes a little more familiar to you because tables are basically a spreadsheet on steroids.
You can have as many tables as you want in that base.
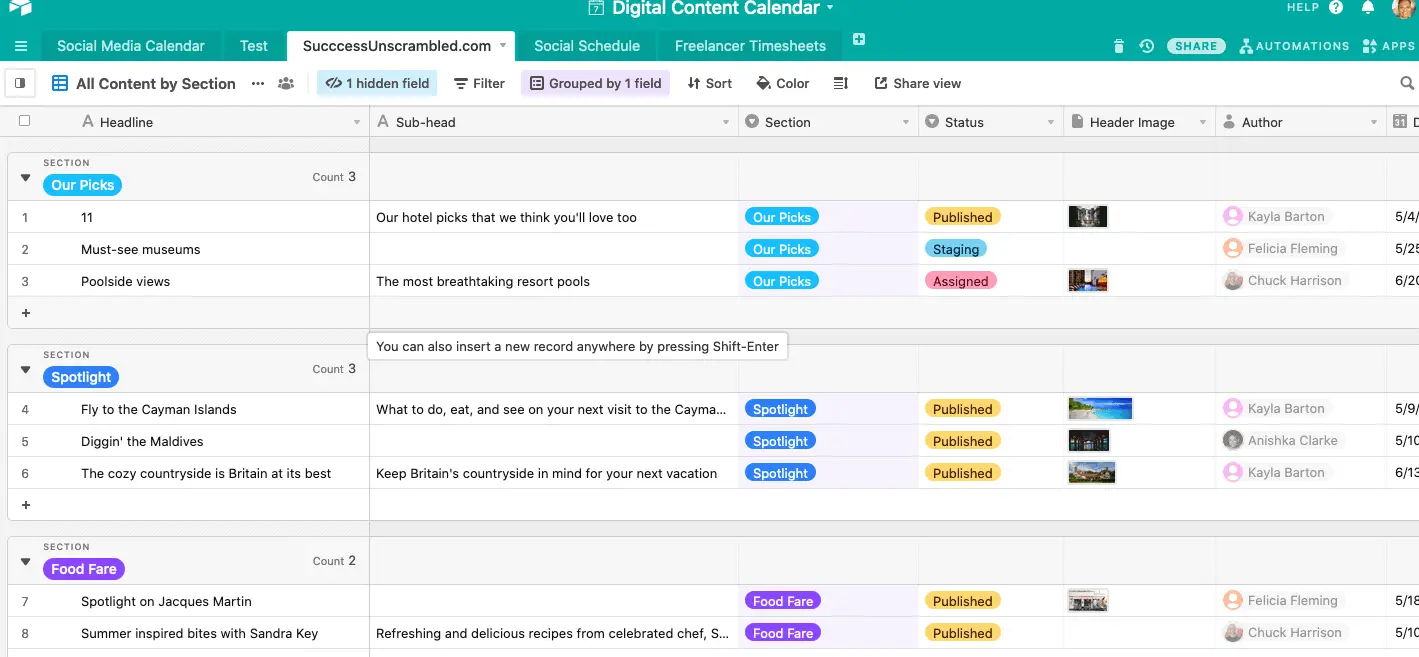
As you can see in the screenshot above this Airtable base has 5 tables. What I really like is that you can cross-link records in Airtable.
Here’s a screenshot where there is a link to another table in this column.

4. Fields
Everything that you place in Airtable goes into a field which is also known as a cell in Excel and Google Sheets.
What is super unique about Airtable is that it actually allows for over 25 different types of fields.
These include:
- Single line text
- Long text
- Attachment
- Checkbox
- Multiple select
- Single select
- Collaborator
- Date
- Phone number
- URL
- Number
- Currency
- Per cent
- Duration
- Rating
- Formula
- Rollup
- Count
- Lookup
- Created time
- Last modified by
- Autonumber
- Barcode
- Button
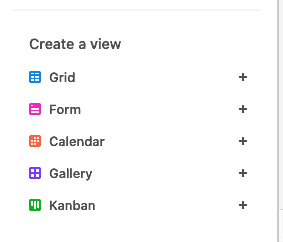
5. Views
Another cool feature that comes as standard in Airtable is something called views.
Think of it as various ways of viewing and processing data.
There are 5 views in total including grid, calendar, kanban, gallery and form.
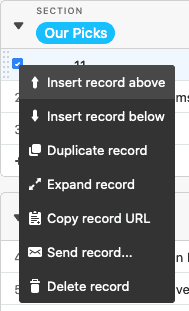
6. Records
Last but not least there are records which are essentially rows of data.
The neat thing about Airtable is that you can do so many things with records including linking to it directly.
In the screenshot below you can see all the options related to a specific record.
Now that you have a great idea of the essential components that make up the features inside Airtable, let’s make a content calendar.
Airtable Content Calendar
In a similar way to other spreadsheet applications, the main components inside a table are the columns and rows.
Spend some time considering what you need to have in your content calendar to make it useful for your business.
For example, if you are making a social media content calendar you will need a few essential items. Including:
- Social media platforms
- Publish date
- Caption or text
- Images
- Hashtags
- Task owner
- Year
- Month
- Theme or topic
- Offer or CTA
- Link to live post
- Campaign
- Posted
Of course, your social media calendar can be a lot simpler but remember that with Airtable you have the ability to filter your views.
So, the more details you include the better it will be for you when you need to run a search for something specific.
Step 1 – List your columns
Compile a list of essential columns that you will need to make this Airtable editorial calendar successful.
Step 2 – Create your columns
Create those essential columns ensuring that you choose the best field type for each heading.
- Social media platforms – multiple select
- Publish date – date
- Caption or text – long text
- Images – attachment
- Hashtags – long text
- Task owner – single select
- Year – single select
- Month – single select
- Theme or topic – single-line text
- Offer or CTA – single select
- Link – URL
- Campaign – single select
- Posted – checkbox
As you can see each of the columns in the list above has been assigned a specific field type.
Check out the video below to see how these columns are created.
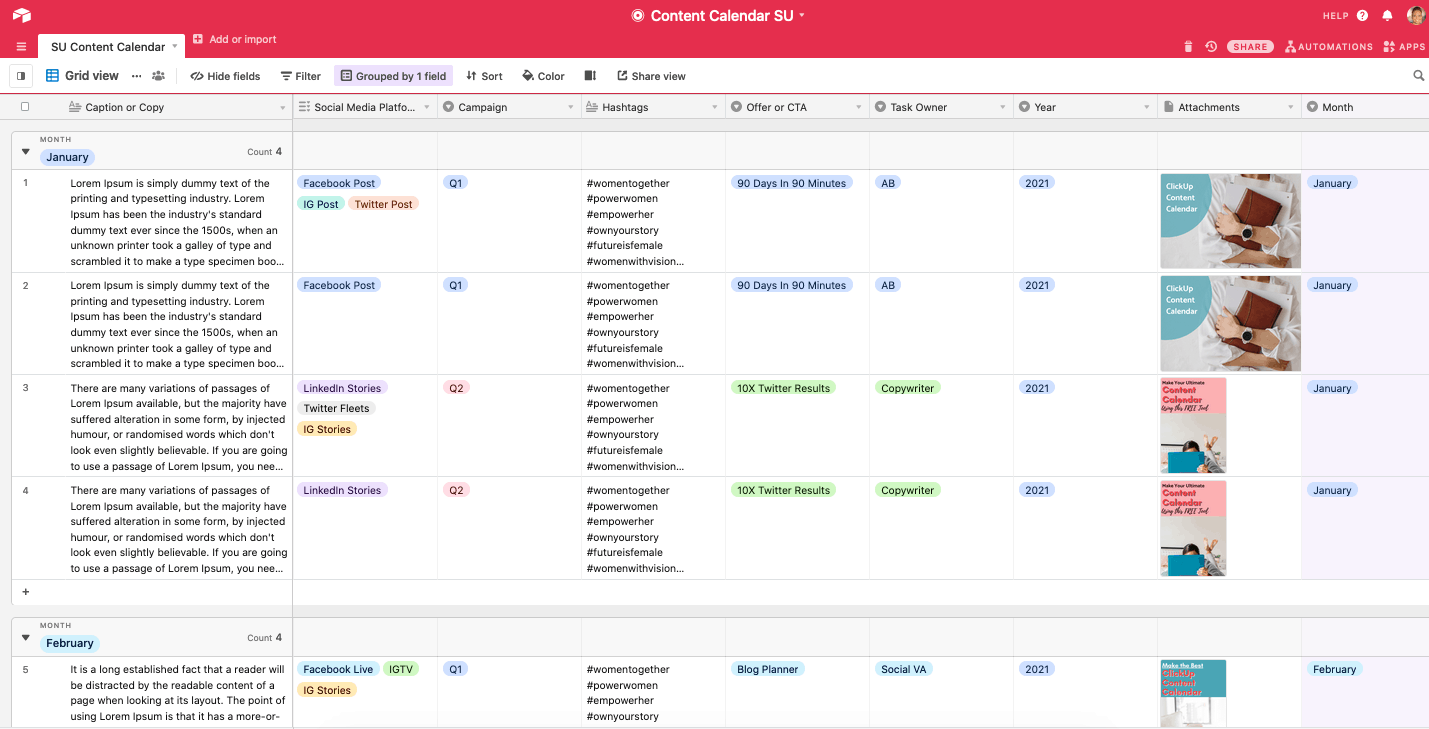
Step 3 – Enter 5 records
Enter your first 5 records to ensure that you have covered all the items you need to make the calendar a success.
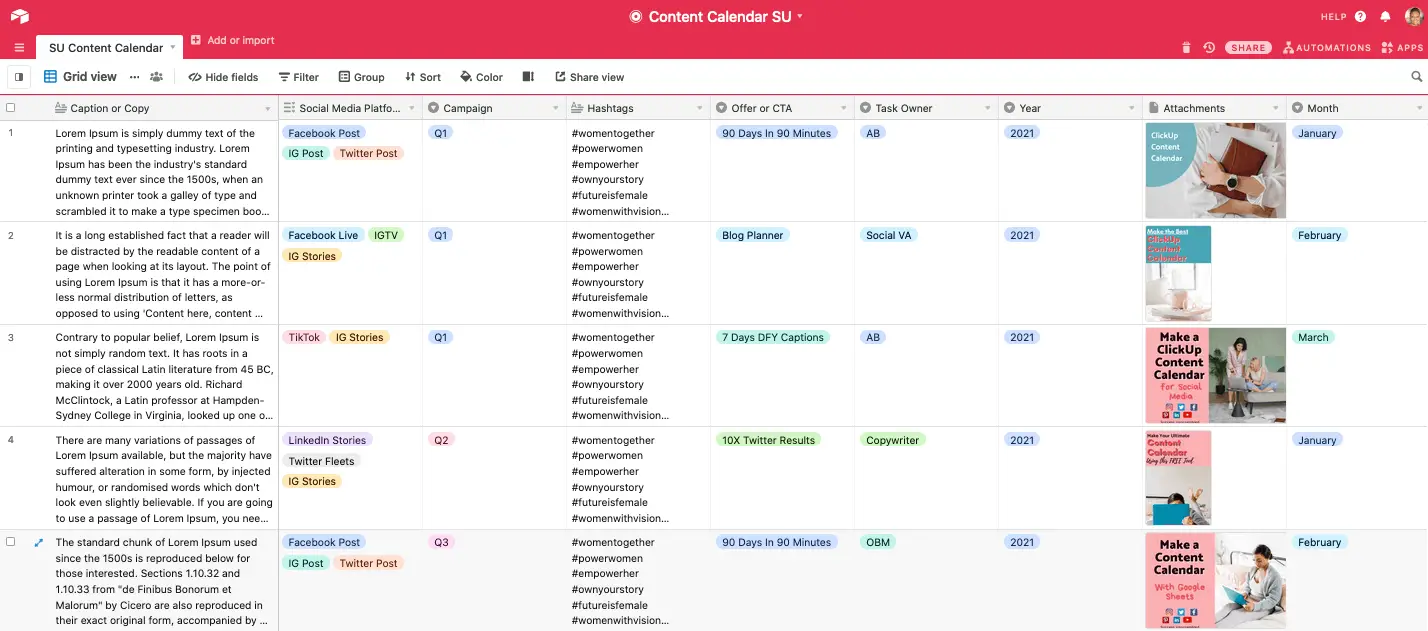
In the screenshot above you will see an example of my Airtable content calendar with the first 5 records.
Now that you have some data to play with let’s see what it looks like in other views.
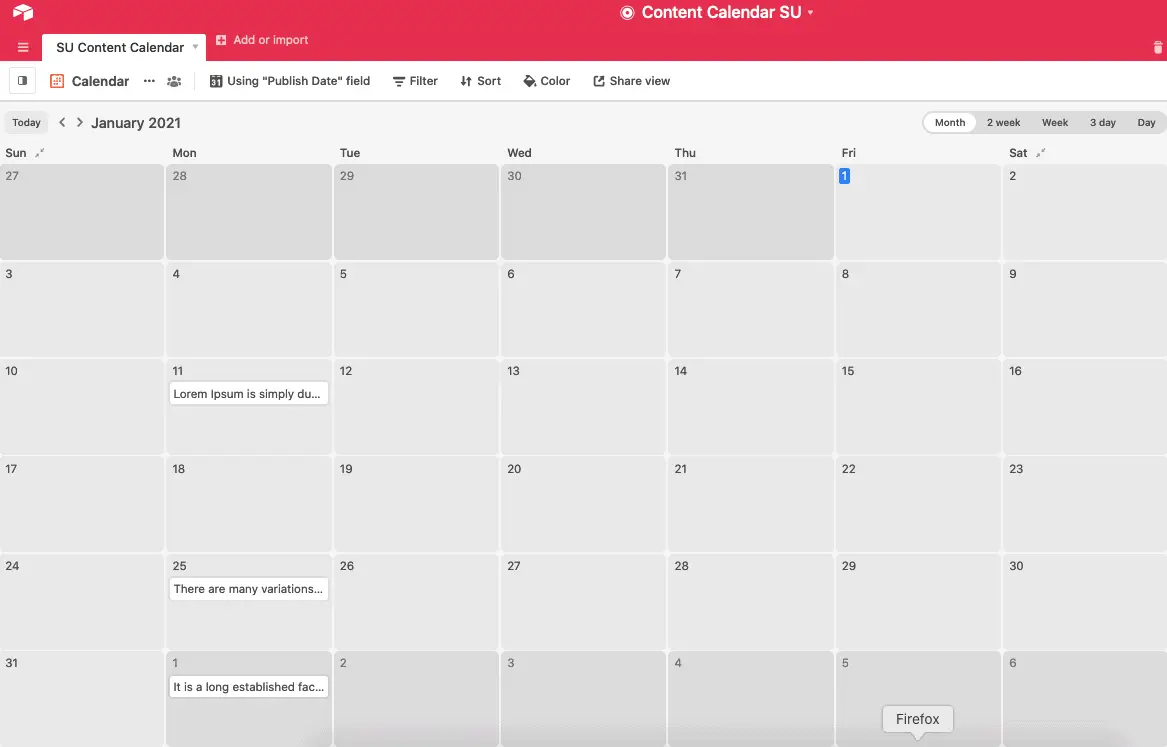
Step 4 – Calendar view
Create a ‘calendar view’ in Airtable for your content calendar to get a feel if this works for you or if you need to make a few changes.
When creating a calendar view ensure that you have a date field setup as one of your columns.
Step 5 – Kanban view
If you will be collaborating with other team members it would make sense to create a Kanban view of this content calendar.
In order to create a Kanban view you need to have a status field or column.
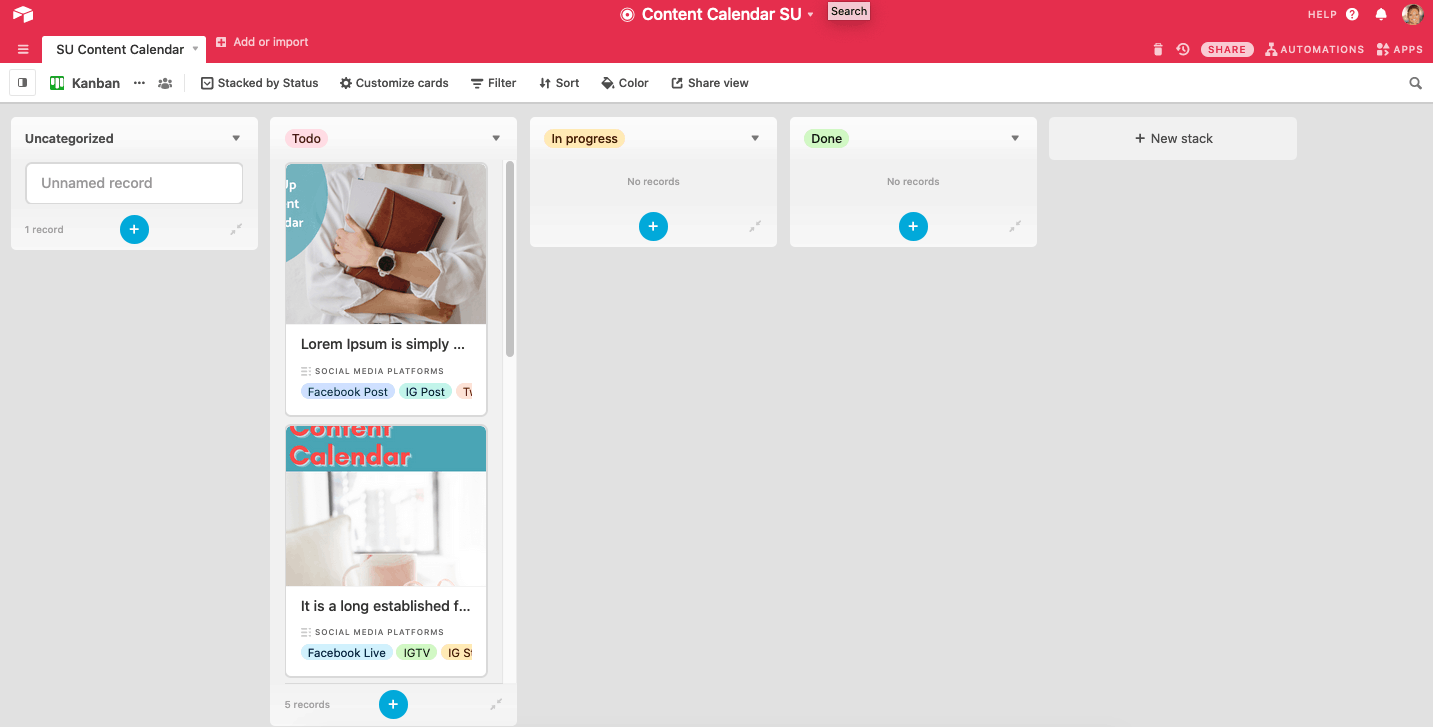
The Kanban view gives you the ability to move the tasks through the different statuses until it is completed in a visual format.
Step 6 – Filter and Group Views
As I mentioned previously, there will come a time when you have a big long list of records that you need to filter or group.
For example, you may have a special group view for anything related to Facebook content.
As well as a different group view for all content to be published on Instagram.
Use filters when you only want to see a specific set of posts. While a group view allows you to see everything broken down by groups.
Here is an example of all the content grouped by month.
While this view is filtered by social media platforms, in this case, Instagram feed posts.

Step 7 – Plan 90 Days of Content
Now that you have the hang of how to use Airtable to create a content calendar, it is time to plan out 90 days of content.
If you have not done this before it is quite easy.
I wrote a post about how to get it done using a Google sheets content calendar here.
How to Auto-post From Airtable to Instagram
This post would not be complete unless I include a section that shows you how to auto-post directly from Airtable to IG.
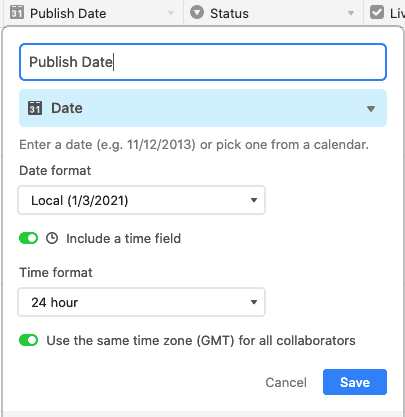
In order for this to work successfully you first need to ensure that your ‘publish date’ field or column includes a time element.
This is easily achieved by switching on the time feature on that column.
Step 1
Create a free account in Zapier if you don’t already have one. You will also need access to your Airtable and Instagram login details.
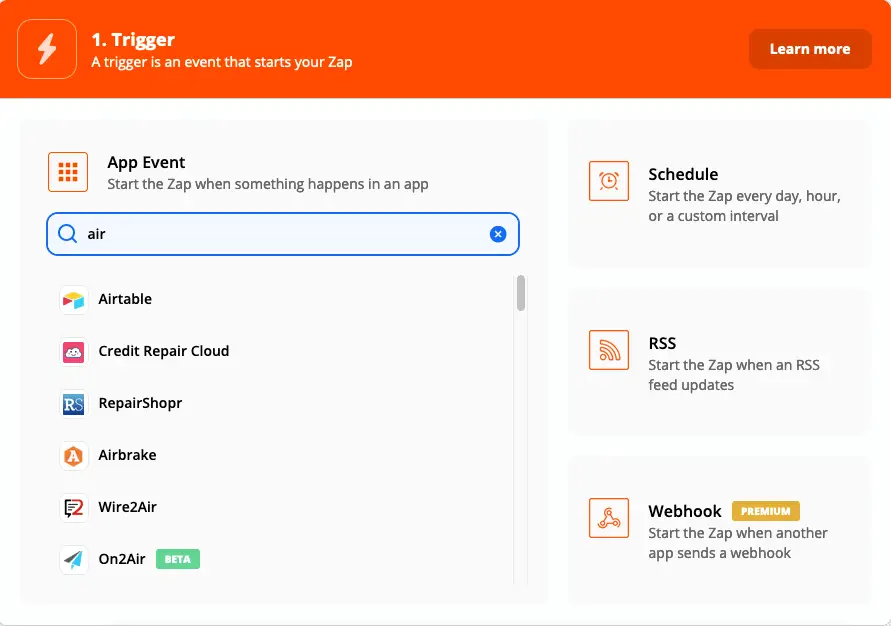
Step 2
Set up a new Zap choosing Airtable as the first element in the process.
Step 3
Choose new record as the trigger for the Airtable event and click continue.
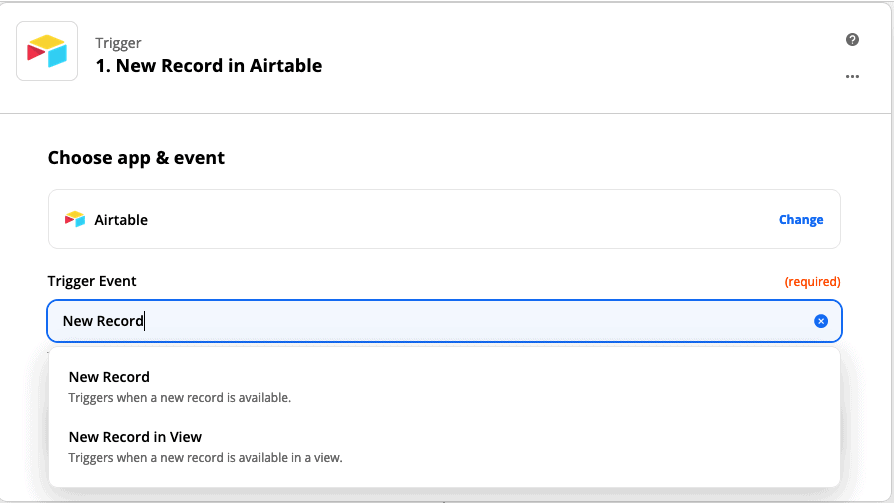
You will then be presented with the option to choose your Airtable account then click save and continue.
At this point, you will be prompted to set up the trigger by choosing the base and table within that base, click save and continue.
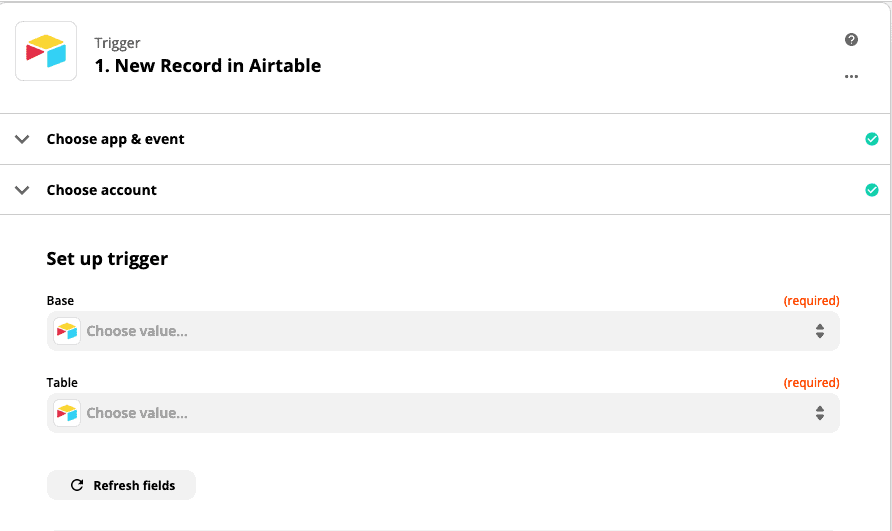
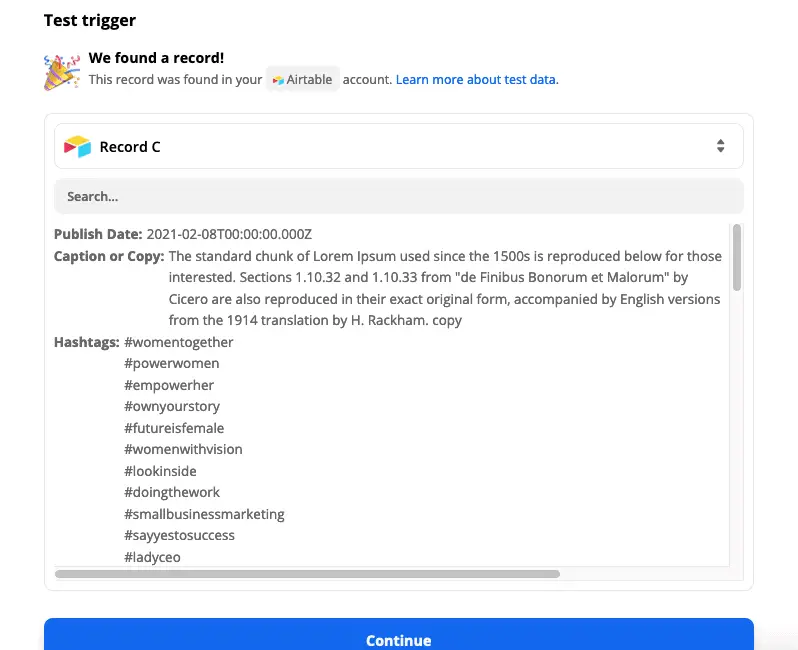
You will be presented with the option to test the trigger that you created.
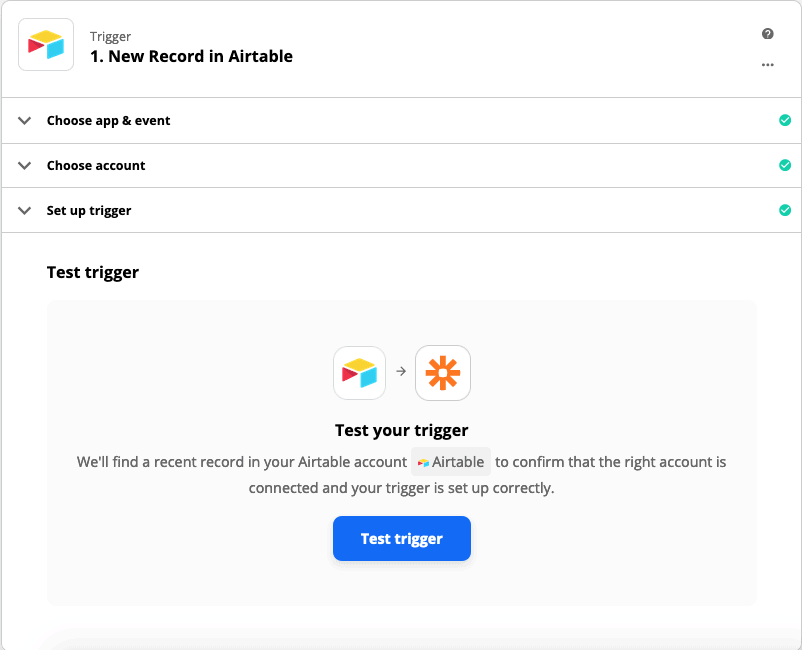
When the trigger is tested, Zapier is checking to see if there are any records in the table that it can use.
Before clicking continue, ensure the chosen record’s published date is within the next 30 days.
If not choose one that has a published date within that timeframe, then click continue.
Step 4
Choose a delay option from one of Zapier’s native apps, see screenshot below.
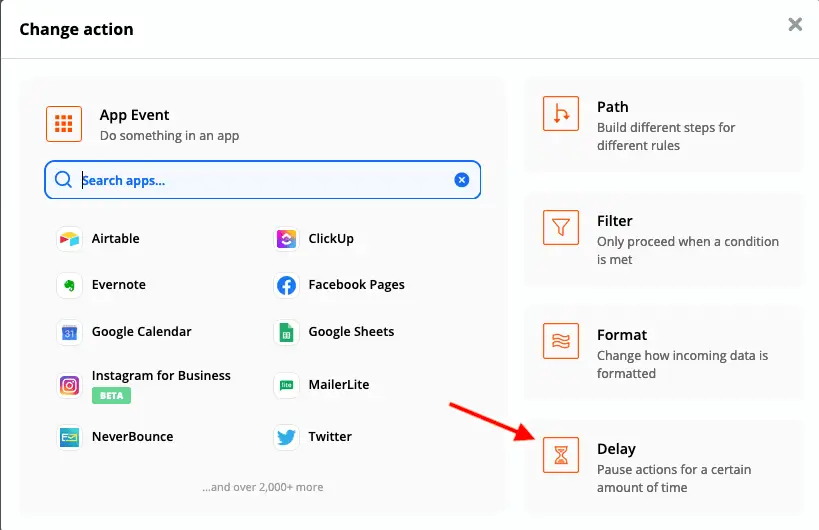
Choose ‘delay until’ from the list of options then click continue.
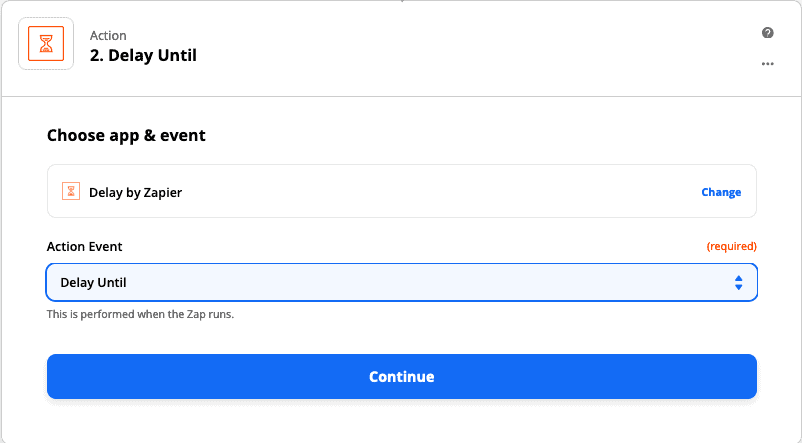
After clicking continue Zapier will bring up a list of options to choose from and it is possible that you will need to click on ‘show all options’.
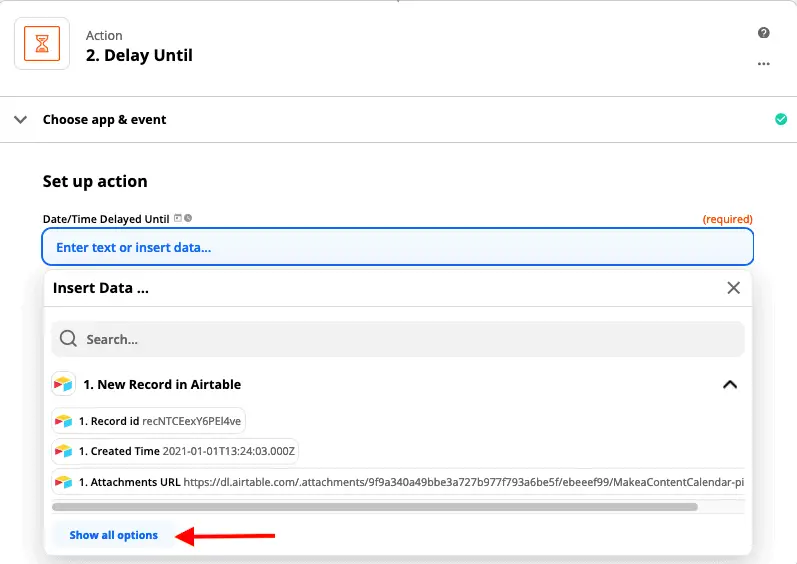
You are looking for the published date field that you created earlier in Airtable.
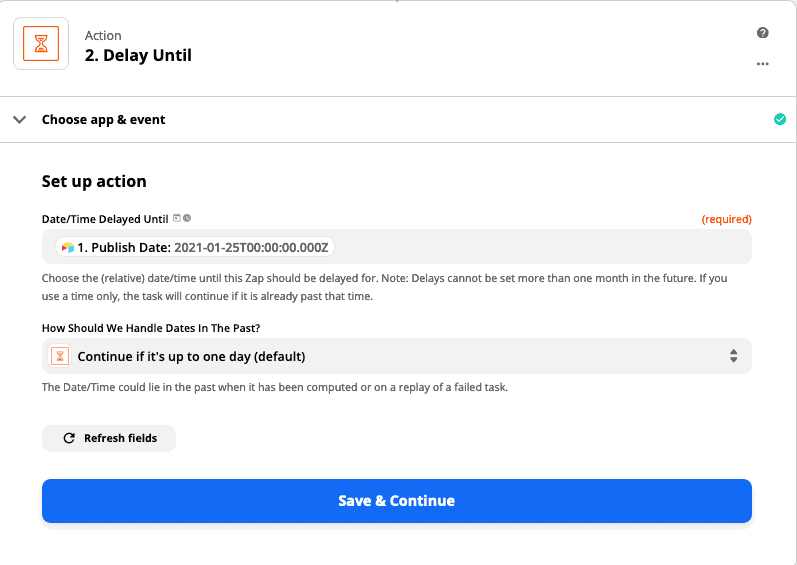
Click save and continue, test and continue, then close.
Step 5
Next click the plus button as we need to connect Instagram to this entire process.
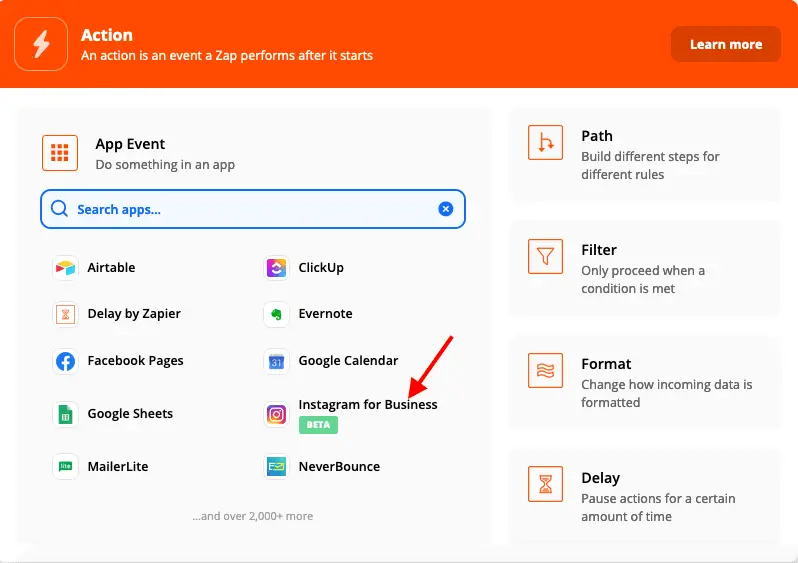
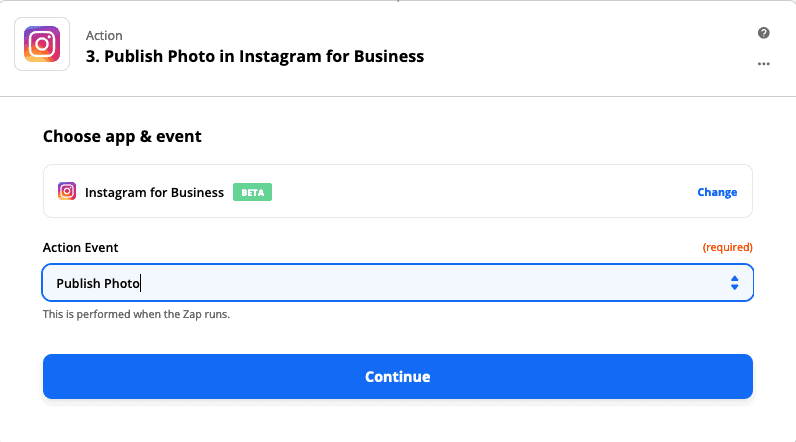
There will only be one event available which is to publish a photo, click continue.
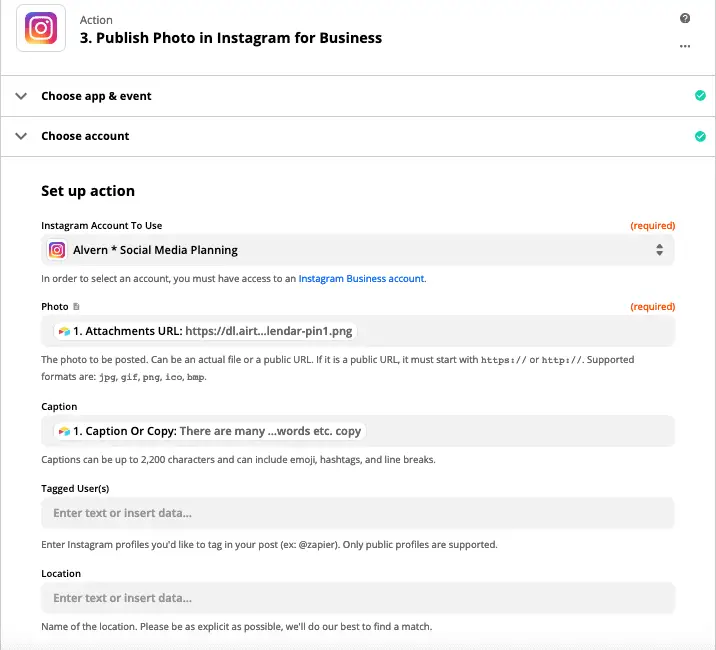
You will be prompted to choose an Instagram account (this only works for business accounts, not personal or creator accounts).
After clicking save and continue you will be presented with the options to choose your IG account plus what you will be posting from that record.
In the screenshot below you will see that I chose my IG account as well as the image URL and the caption or text.
Click on save and continue, you will then get the option to do a test to ensure that your Zap works.
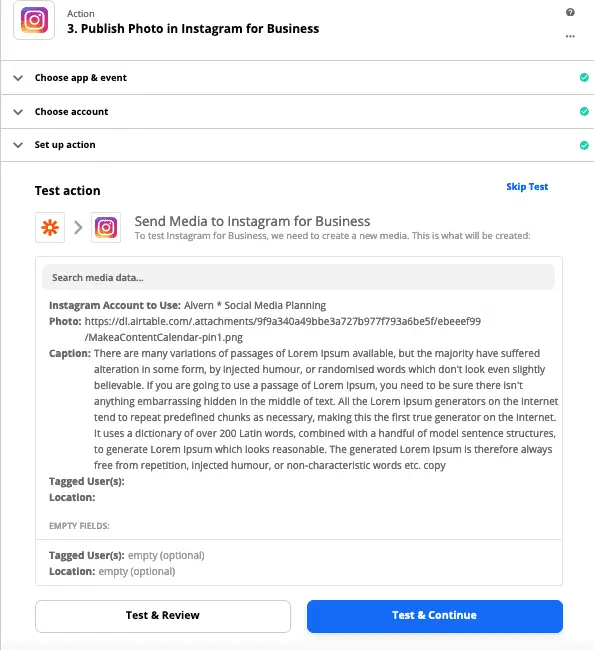
Just click test and continue and remember to switch on the Zap.
Also, remember to give your Zap a sensible name so that you can recognise it the next time you log into Zapier.
If your image is the wrong size you may get an error message. Just upload the correct image size and run the test again.

Summary
Using Airtable for social media can be as easy as pie if you already have a 90-day content plan.
However, if you are one of those who struggle when it comes to creating content quarterly I may have a solution for you.
While social media can be a lot of fun, it can feel like a constant content hamster wheel if you don’t have a great content planning resource.
That is why I created the 90 day content plan to help solopreneurs like you to get the most out of social media planning.
It will not cost you a lot of money and you also get 365 days of content that you can reuse year after year.
It takes less than 90 minutes to plan 90 days of content so no rocket science education needed.
Interested? Grab your 90 day content planning bundle here.
Announcements
Remember to subscribe to the Success Unscrambled podcast where you will be the first to hear what’s happening in the entrepreneurial and digital marketing world.
Your positive review of this podcast is vital to keeping it alive and running for the next 12 – 24 months so please leave a positive review for us on iTunes, Spotify or any of your favourite podcast players.
This blog was started back in 2017 as a way to help reduce women illiteracy around the world.
Because this is a huge undertaking I have decided to help 1,000 women over the next 10 years to become wildly successful in their online business through simplified marketing strategies.
We will be able to build a strong business network of women who can donate 1% of their profit to the cause.
Together we can help reduce women illiteracy worldwide.
Would you like to be part of this movement? Shoot me an email using alvern (at) successunscrambled (dot) com.
Airtable Content Plan Related Posts
- The best Asana vs ClickUp comparison
- Content calendar via Google Sheets made easy
- How to make a professional ClickUp content calendar
- Only the best 100+ hashtag holidays for entrepreneurs
- 12 months of amazing social media prompts


28 thoughts on “How to Set Up an Airtable Content Calendar in 7 Easy Steps”
Thanks for sharing this detailed post about creating a content calender.It is really helpful and easy to follow.I will try these steps.
Amila, I am glad to hear that it is easy to follow.
I have actually only heard about Airtable a couple of days ago, when a friend of mine was testing a content strategy. I usually just use Google drive, but I can see why Airtable is superior, as it has so many other options that can streamline the entire scheduling process.
Joanna, you are right, Airtable does offer a superior look and feel.
I need to try this out. I do need to start getting more organized with my posting, so this will come in handy.
Amber, getting organised is one of those secrets to consistent success.
This content calendar from Airtable sounds exactly what I need right now. My social media goals are all over the place and this will help me better plan out my content.
Lisa, yes Airtable can really take you from chaos to calm or overwhelmed to organised in a few short hours.
This would be very useful for my website. I think it would help me be more organized.
Tara, I am sure you will be able to get more organised with this content calendar.
Hmmm I have never really tried this. Maybe I should start working on one. Thank you for this.
Sigrid, you are very welcome.
Thank you for this very insightful post! It’s the first time I hear about Airtable but I see what a useful tool it is especially for social media.
Cristina, yes it can be an awesome game-changer for social media.
You always propose useful tools for bloggers and not only. Never heard of Airtable, but it seems it might make my life a bit easier! 🙂
Natalia, I use it with my clients all the time to help them organise their business and make it more efficient.
This is such a very detailed article. It makes one too lucky to have read and encountered this.
Berlin, I am glad you like the details.
This sounds like an awesome tool to use! I really need to get more organized and utilize tools like this for my blog.
Marysa, you are right, it is an awesome tool.
Wow way to break this down so succinctly. I had never heard of Airtable but think it could actually be an incredibly handy tool to keep track of our content creation and scheduling with my team. I’m gonna looking to this more, thanks!
Annie, you are very welcome.
I have just taken on a partner so this will help us keep organized.
Cindy, congrats on the business move to take on a partner.
Wow! I’ve never heard of this before, sounds awesome for getting organized. I love being organized, I’d be lost without my daily planner. This would be a great addition to my blogging and social media content.
Eloise, it really does help you to stay organised.
Thanks Alley. I had to laugh when I scrolled down to the pics as I am sitting in my bed, with my laptop, with a cup of coffee 🙂
That’s awesome Linda
Comments are closed.