Podcast: Play in new window | Download (Duration: 32:37 — 45.3MB) | Embed
Subscribe: Spotify | Amazon Music | Email | TuneIn | Deezer | RSS | More
If you are using video for marketing you know how important it is to add subtitles to videos.
However, this process does not seem to be as straightforward as you originally thought.
YouTube creators know that in order to get this done they need to either have the script already written, word for word.
Otherwise, they would need to painstakingly write out the text using the YouTube Creator Studio.
While this may seem logical for the casual onlooker I want you to stop and think of what that process looks like for a second.
You spend endless hours planning, shooting and editing a video to get the copy, thumbnails, description, keywords and tags right.
Imagine having to upload 3-5 of those videos every week and still needing to write the subtitles or captions.
What if there was a way to get this done faster or to have them auto generated in the background while your videos are uploading.
The truth is that there isn’t a one size fits all solution for all social media platforms.
In this post, you will learn how to easily add subtitles to almost all your social media videos including Facebook, Pinterest, IGTV, Twitter, LinkedIn and YouTube.
So that you can grab the attention of your followers without feeling overwhelmed and frustrated every week.
What are Subtitles and Why You Need Them?
In case you are new to the world of video marketing on social media let me spend some time explaining what are subtitles or captions.
Subtitles are basically the script of the video or audio file that you watch or listen to online when the sound is off.
Camille Hughes of Intro to Digital reported that “video traffic accounts for about 80% of all consumer traffic”.
She goes on to say that “videos that are about two minutes, generate the highest engagement levels.”
Did you know that 85% of Facebook videos are watched without sound? A whopping 60% of Instagram videos are watched with the sound on.
The number one reason why you need subtitles or captions are for those people who would like to consume video without sound.
If you think that this is weird try to remember a time when you really wanted to watch a video but didn’t have earplugs or headphones.
Consumers dictate how marketers should cater for their every need just by their behaviour alone.
Yes, I know of some people who would try to lip read the actors on video but I am just not there yet.
Which Platforms Accept Video + Criteria
At the time of writing this post, I can think of 5 social media platforms used by business to promote content via video outside of YouTube.
These platforms include:
- Instagram (IGTV + Stories)
Let’s spend some time looking at each platform as well as their capabilities for subtitles.
Of all the social media platforms, Facebook seems to be ahead of them all because they now offer autogenerated subtitles or captions.
Did I mention that these auto-generated captions are close to 100% accurate?
I have been doing a Facebook Live Monday to Friday for the last 2 weeks and the subtitles have been amazing.
It is a little bit scary when I think about how accurate these subtitles are compared to those on YouTube.
Has Facebook been listening in on my conversations? Their recognition of my voice is too accurate.
So, what are the accepted dimensions for Facebook videos?
Facebook Video Design Recommendations
- Aspect Ratio – 16:9 or 9:16 (vertical + horizontal)
- Max File size – 4GB
- Maximum length – 240 minutes
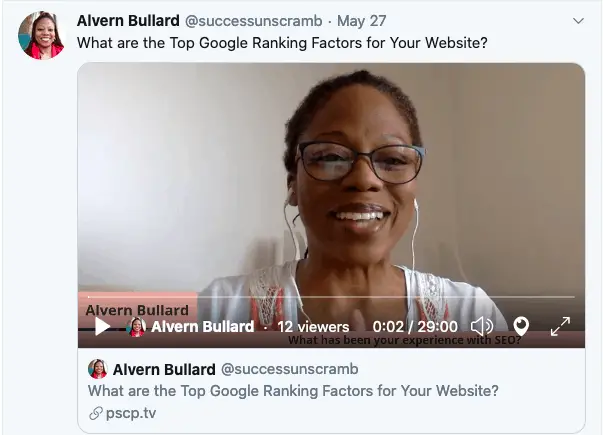
Although Twitter is not a very popular platform for many bloggers it is still used by many business people.
You have two choices when uploading videos to Twitter. You can either do a native upload by logging into the platform.
The other option is to go live using Periscope ensuring that you link it to your Twitter account.
When you go live, your video will automatically show up inside your Twitter feed.
In order to get subtitles on your videos in Twitter there is a little bit of a catch.
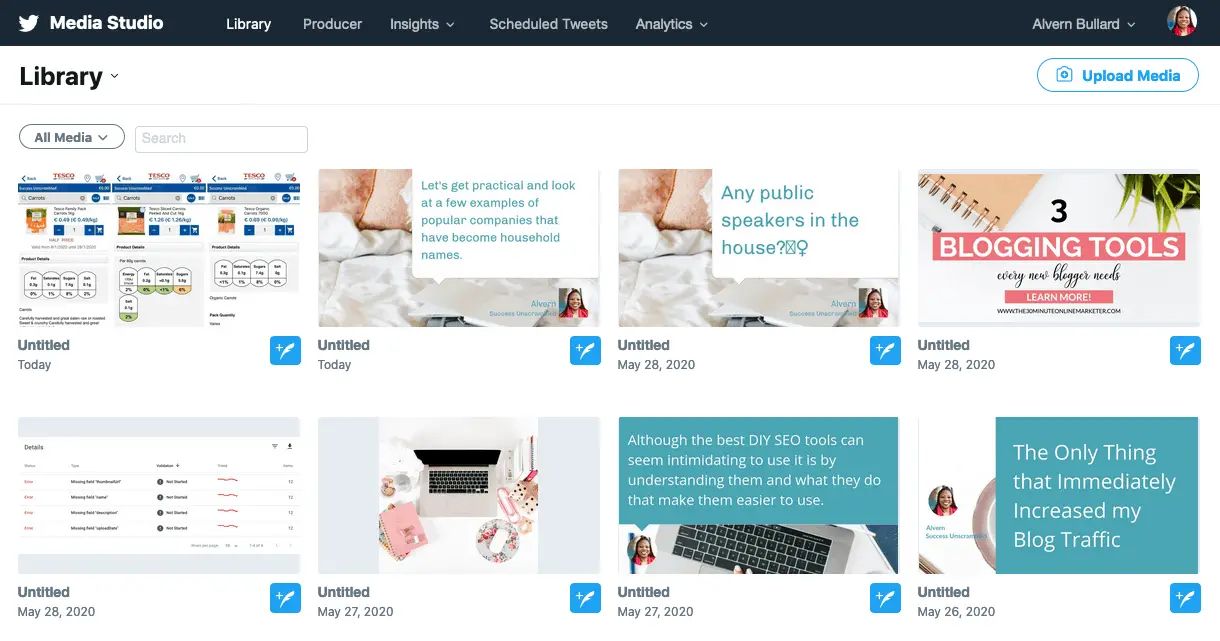
You need to head over to studio.twitter.com if you already have an existing Twitter account.
It is also known as Twitter Media Studio. You will come to a library that looks like the screenshot below.
Unfortunately, videos uploaded here can only be 2 minutes and 20 seconds in length.
I know that sounds confusing because you can upload longer videos on the front end.
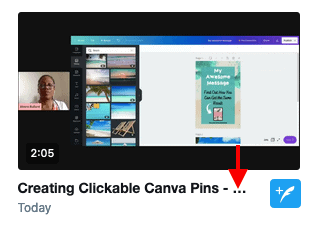
After uploading the video you need to click on the three dots as shown below which brings you to the media details view.
Next click on subtitles, select the language of the subtitles and upload your SRT file.
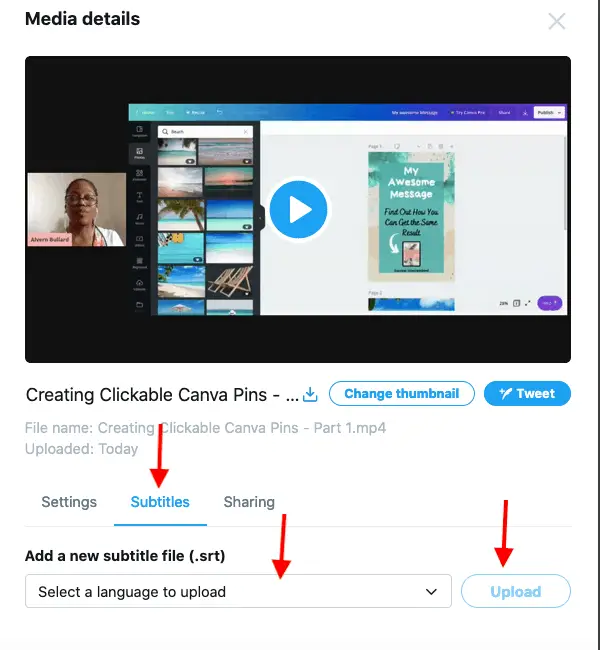
If you don’t have an SRT file you will learn how to easily get one later on in this post.
Twitter Video Design Dimensions
- Aspect Ratio – 16:9 (horizontal only)
- Max File size – 512MB
- Maximum length – 2 minutes and 20 seconds
If you have used Instagram you will know that there are two different sections of Instagram where you can find people’s videos.
The first is via Instagram stories and the other is on IGTV.
It will not be normal practice to add subtitles to Instagram stories due to the nature of those posts. You can add text and hashtags in stories.
However, IGTV continues to blow up and surprise everyone by what you can find on that platform.
Bearing in mind that the preferred format of these videos is that they are vertical or 9:16 or 1080×1920 in size.
It is not surprising that there are tons of cooking videos on IGTV where people have adapted to suit the required media.
In case you have tons of 1920×1080 or 16:9 or landscape videos and you are wondering how to get those into a vertical format, I will show you later.
Uploading Videos to IGTV
For best results, you should burn subtitles or caption into videos into IGTV videos before uploading them onto the platform.
As of now, there is no way to upload a separate SRT file to the IGTV platform so captions would need to be hardcoded into the video file.
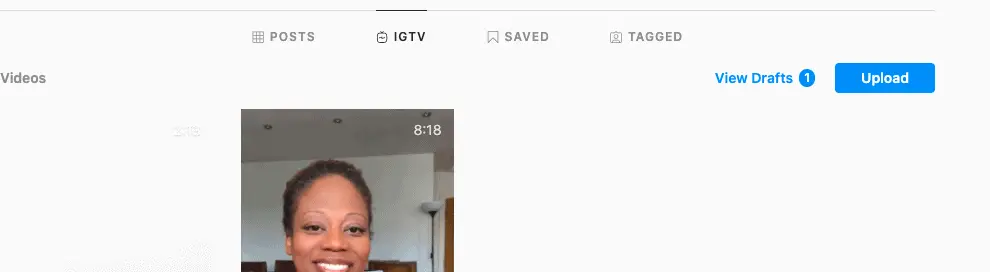
The good news is that you can upload a video to IGTV using your desktop via your web browser.
Simply click on IGTV, then click the upload button.
You will then see this screen. Go ahead and upload your video, enter a title and a description.
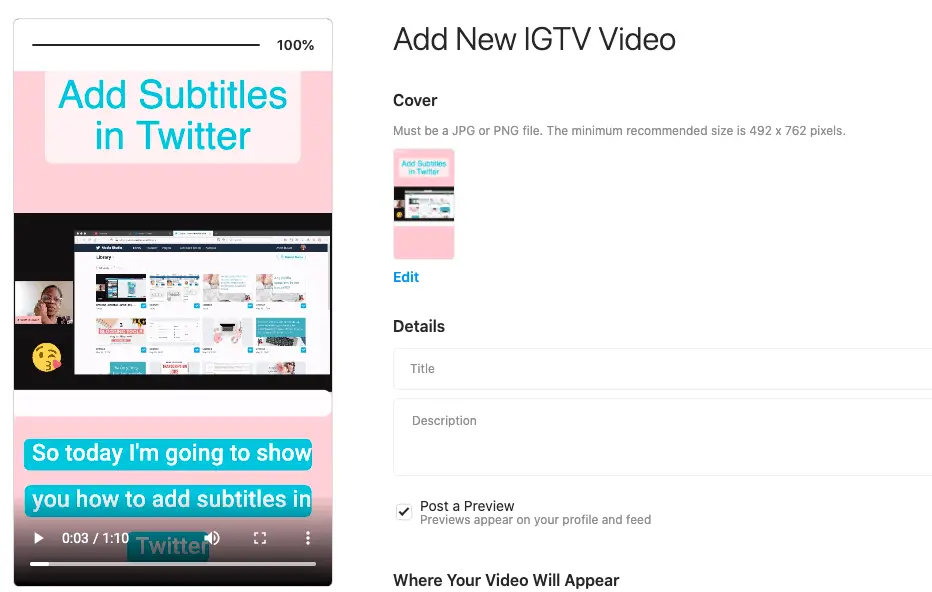
Adding your own custom cover photo will also help to gain attention in the IGTV feed.
IGTV Video Design Dimensions
- Aspect Ratio – 9:16 (preferred) and 16:9
- Max File size – 3.5GB
- 10 Minute Video – Max 650MB
- Maximum length – 15 minutes from mobile, 60 minutes from the web
- File format – MP4
One of the most tricky platforms when it comes to videos is the Pinterest platform.
The reason for this is because they seem to be still in the testing phase of accepting videos on Pinterest.
Each time a video is uploaded, it needs to be manually approved before going live.
A key concern for businesses is getting a return on your investment. So far, the performance of videos on Pinterest seem to be a bit of a ‘hit and miss’ affair.
I will still cover video requirements for Pinterest in the meantime since it is something that may take off in the near future.
Videos are called ‘video pins’ and images are just called pins or pin images on Pinterest.
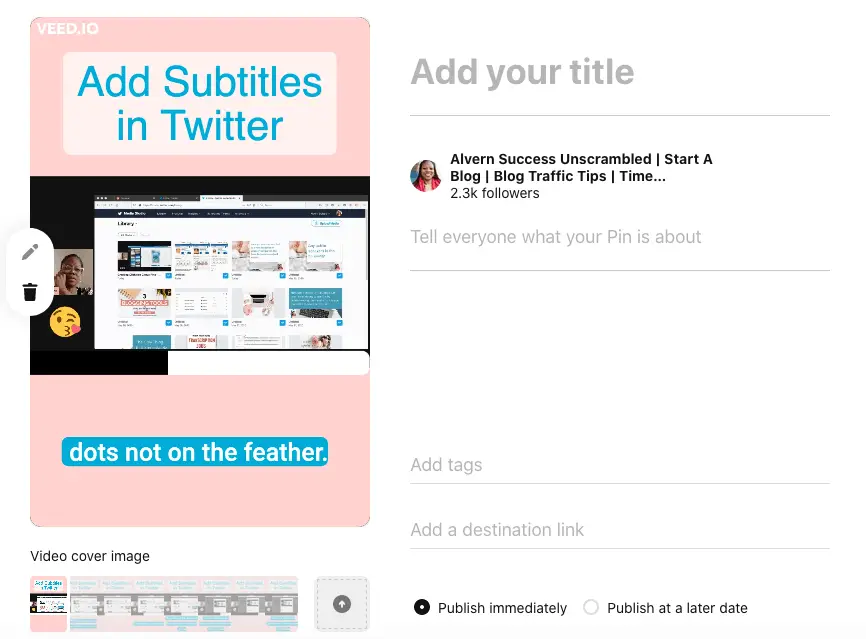
Click on the plus button on the top right and you will be brought to this screen.
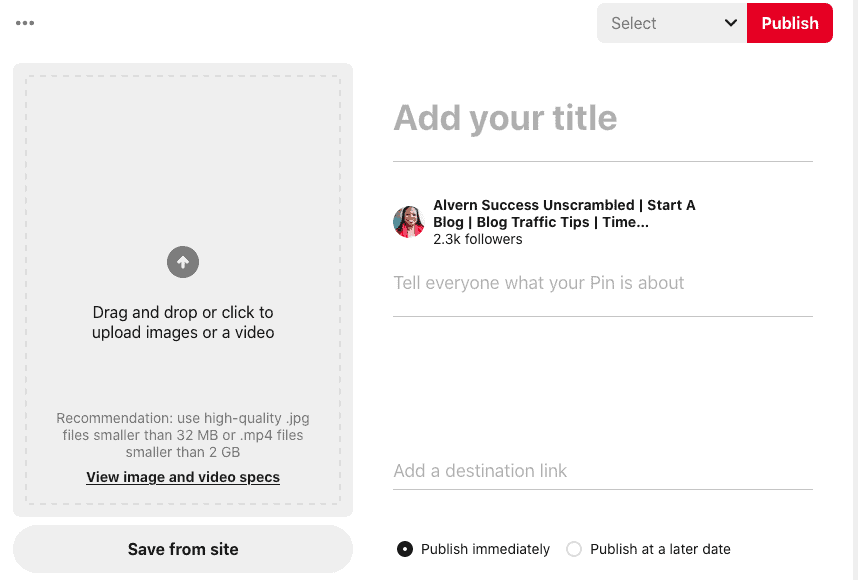
Upload your video and you will then get the opportunity to add a title, description, link and tags.
The option to choose your own custom video cover is also available.
Once completed, choose a Pinterest board and click publish. Your video pin will go into a review queue and should go live in 24 hours.
Pinterest Video Design Dimensions
- Aspect Ratio – 9:16, 1:1 or 2:3
- Max Filesize – 2GB
- Maximum length – 4 seconds to 15 minutes
- File format – MP4, MOV, M4V
One of the best places to get your videos in front of decision makers really quickly is by uploading your videos to LinkedIn.
As you can imagine, your videos really need to be on point and eye catching to get the positive feedback that you need.
There are two options on LinkedIn when it comes to video. You can go live or you can upload a video to the platform.
To get started simply click on ‘start a post’ and you will be presented with this screen.
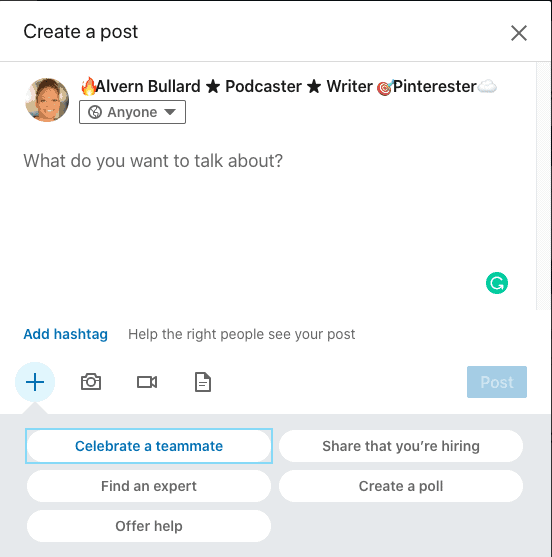
The camera icon is for images, while the video icon is for uploading videos, so click on that one.
As you can see from the screenshot you will be presented with the option to add a SRT file and even a thumbnail image.

Once you are happy click done and publish the video.
Personally, I find that ClipScribe is the best application for editing LinkedIn videos because they give you a professional finish.
You can see my review of all the subtitle software platforms, including ClipScribe below.
LinkedIn Video Design Dimensions
- Aspect Ratio – 1:2.4 or 2.4:1 or 9:16 or 16:9
- Max File size – 5GB
- Maximum length – 10 minutes
- File format – MP4, AAC
Video Conversion + Subtitles Software
First let me introduce you to the subtitle producers of the Internet.
These applications give you the ability to not only go from 16:9 to 9:16 but they help you produce those SRT files.
- Quicc.io
- Clipscribe
- Zubtitle
- Veed
- Otter.ai
- Kapwing
Not all of these applications are created equal. Each of them are great to one extent or another.
Let’s briefly look at each one in turn in terms of what they are offering as well as their pros and cons.
1. Quicc.io
This application is 100% online which is great news and they give you the option to get your first 5 minutes free.
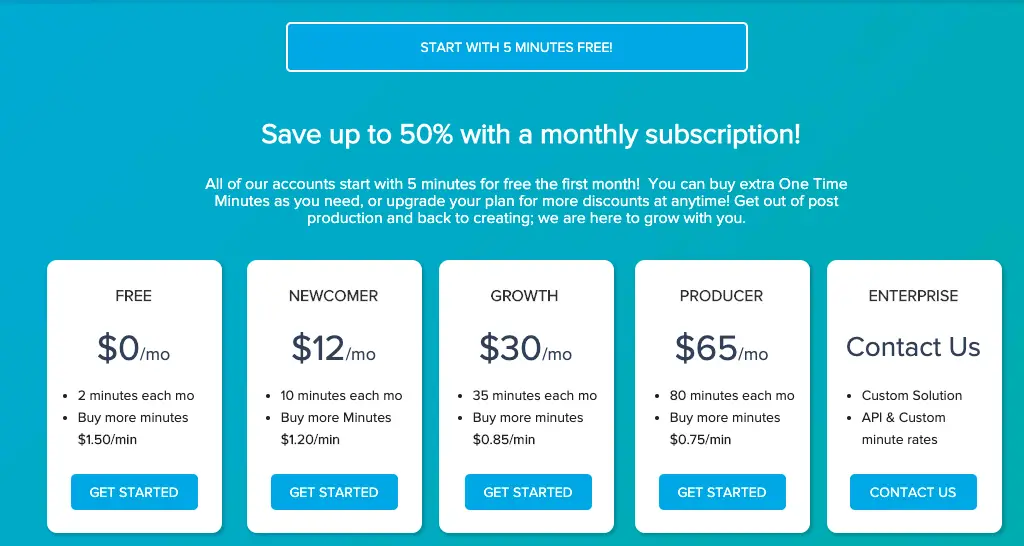
Depending on the length of the videos that you create every week or each month you may find these prices awesome or expensive.
After verifying your account you are brought to this screen below.
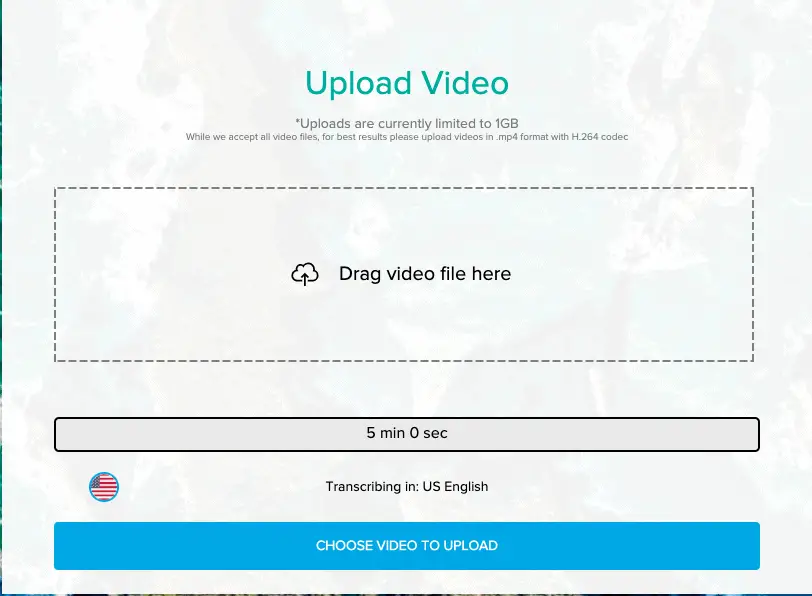
It took less than a minute to upload my video which was 2 minutes in length.
You come to the screen to edit the captions. The resulting subtitles were not 100% accurate but they were okay.
There is also the option to change the font used, colour of the shadow as well as the font size.
It does not have the option to convert the video into vertical format but you do have the option to download the SRT file.
If you are uploading a video to Twitter or YouTube then this is a great way to get your SRT file for free.
Another proven way to skyrocket your results on YouTube is using two clever extensions called VidIQ and TubeBuddy.
For a detailed comparison between the two, you can check out the VidIQ vs TubeBuddy resource right here.
2. ClipScribe
They are currently doing an introductory offer on ClipScribe where you can get the annual subscription for $45.
You will be limited to 30 minutes per month and they offer a 7-day refund policy.
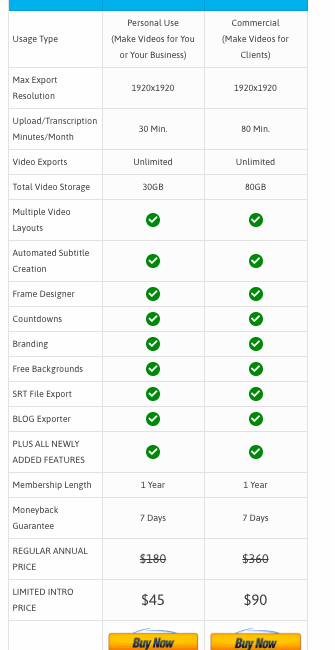
You have the ability to use it both on desktop and mobile devices. Feel free to check out the full demo here.
What I really like about ClipScribe is that they offer 9 video sizes for you to use and you can literally turn your 16:9 video into a 9:16 easily.
The ability to add a headline, choose the position and even customise the bottom bar design is refreshing.
Of course adding your logo to the video is also a great feature.
We all know that adding emojis to media is the secret sauce to get engagement which is included as standard with ClipScribe.
A key item that blows everything out of the water is the animated countdown feature which is awesome.
One major drawback for me is the fact that you are limited to only 30 minutes a month.
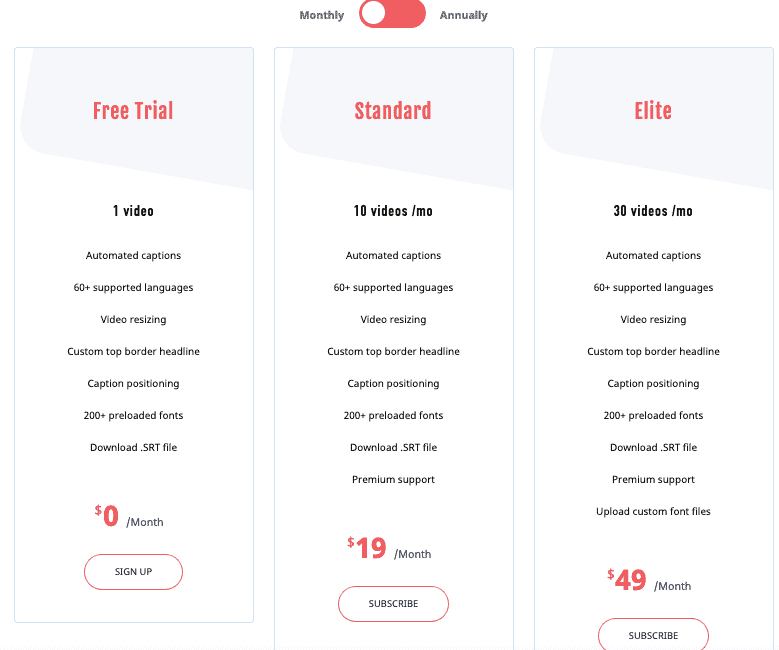
3. Zubtitle
Before deciding to go with those two options let’s have a look at Zubtitle to see if they offer a solution that is more suitable.
They do offer a free trial which is great as you have the ability to do a test run before committing to purchase.
After you log in and upload your video you are brought to this screen to edit your captions.
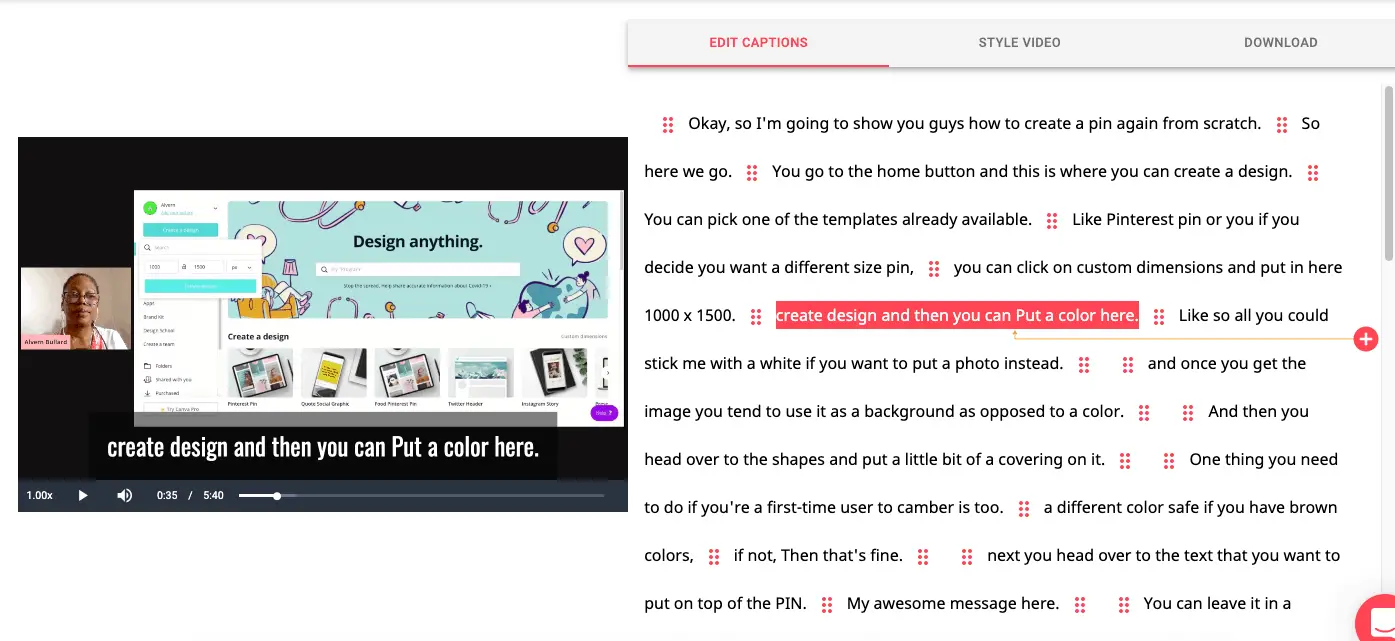
Once you are happy with the subtitles or captions you can head over to choose what style video you want.
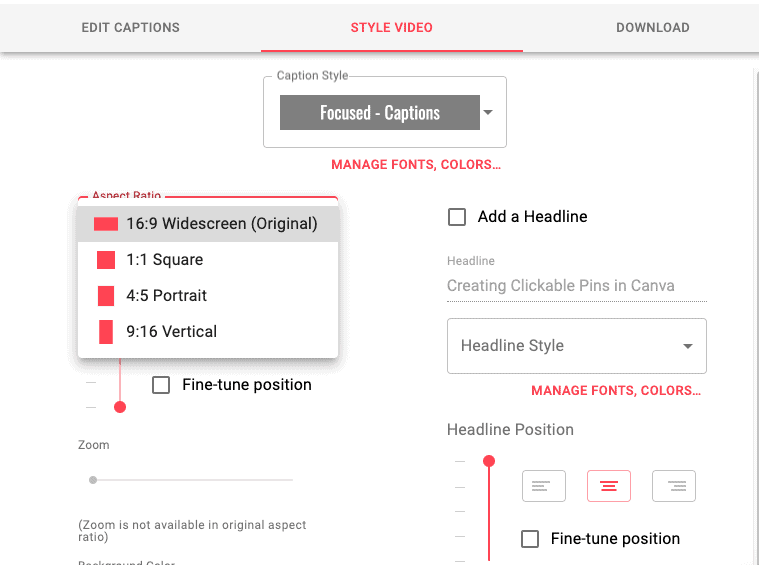
As you can see you are presented with 3 other options including one for vertical videos.
If you decide to go with a vertical video then these are the options available for that selection.
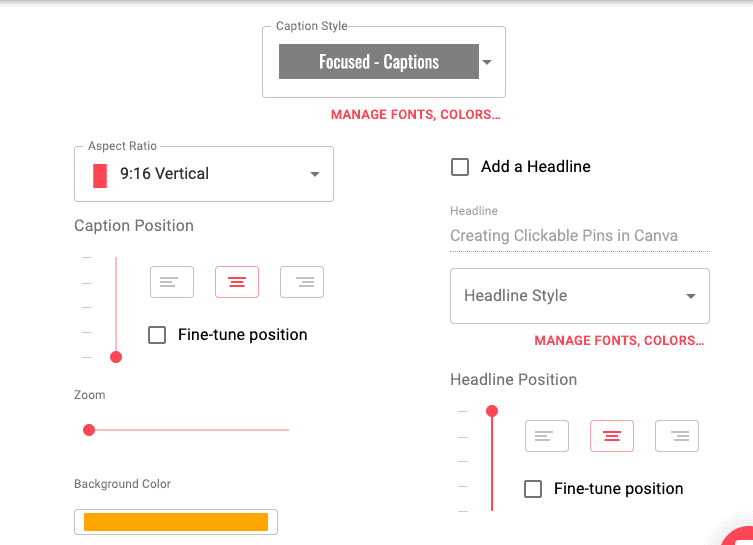
You do have the ability to add a headline and even choose the position of both your headline and subtitle.
There are many options to adjust the font type and colours to suit your brand.
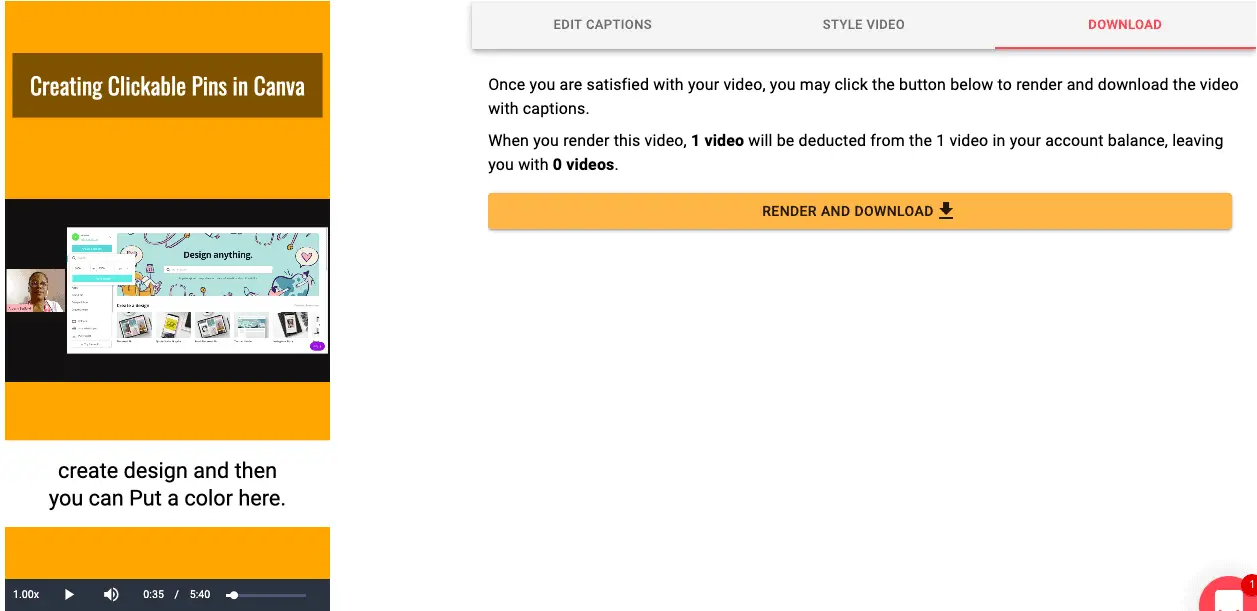
Finally, you are brought to the download section so that you can take your masterpiece and upload it to IGTV, Facebook, LinkedIn or Pinterest.
What I really like about Zubtitle is that their captions are very near to accurate compared to the extra work to get them right in Quicc.io.
4. Veed
Veed is another application I came across recently and their pricing combined with video allowance looked way more attractive when compared to the other options.

There is one small catch that I noticed before making a purchase. Unless you are on the Pro plan the maximum video size you can upload is 50MB.
You may have a video that is 5 minutes long but the actual size is over 100MB which is a bit disappointing.
After uploading your appropriately sized video into Veed, you will be presented with this screen.
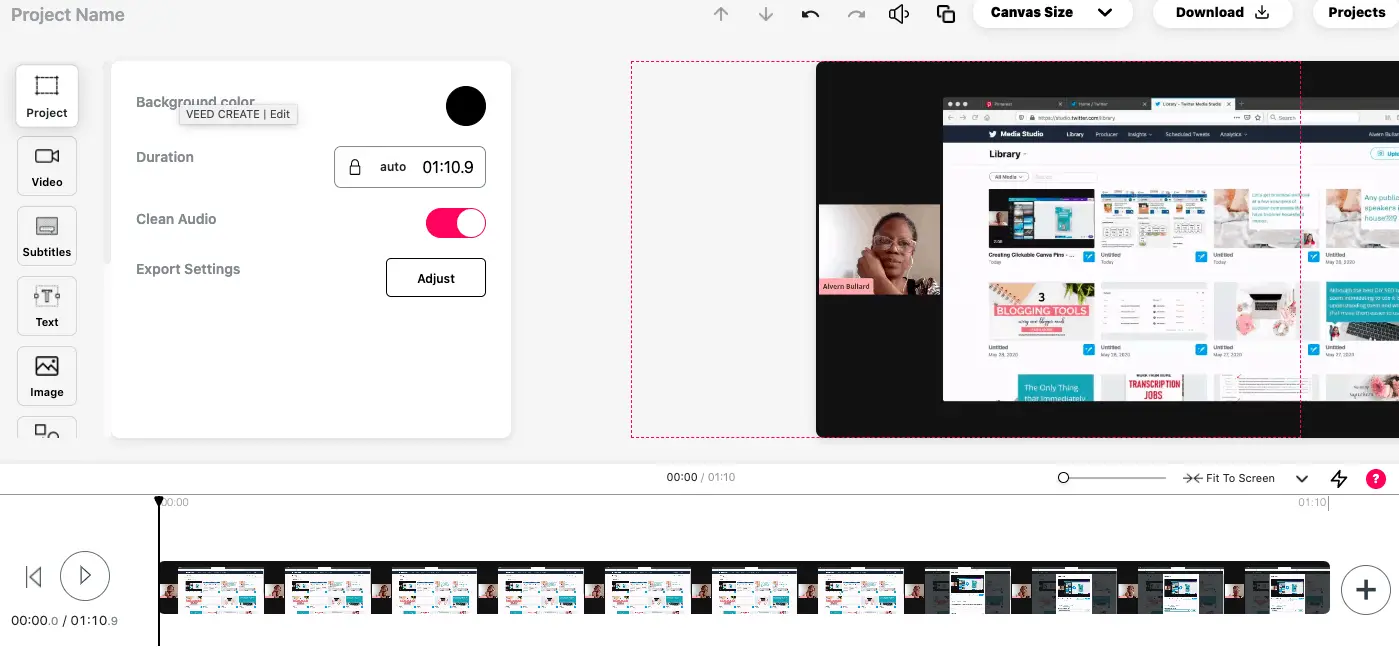
I am like a kid in a candy shop when it comes to testing new software and I already clicked the clean audio button just to see what happens.
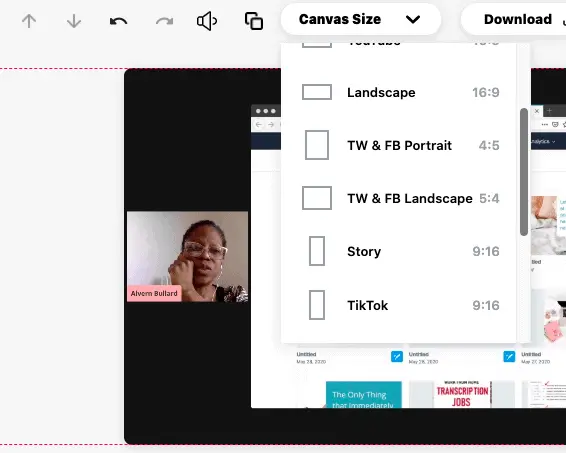
In terms of video size options there are 11 available including one size for TikTok.
Veed appears to be a proper video editing software that also comes equipped with its own timeline.

You get the option to do auto-generated subtitles, input them manually or even upload your own SRT file.
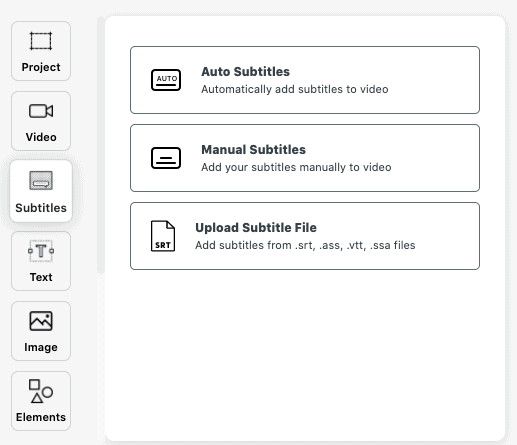
In one sense the application seems to come with a ton of options like adding emojis, progress bar, soundwave and shapes.
The ability to add your own images and brand elements is also available.
If you want to take the video and create a different size simply duplicate the project and adjust accordingly.
When it is time to download your video you are given the option to download it as a video or animated GIF.
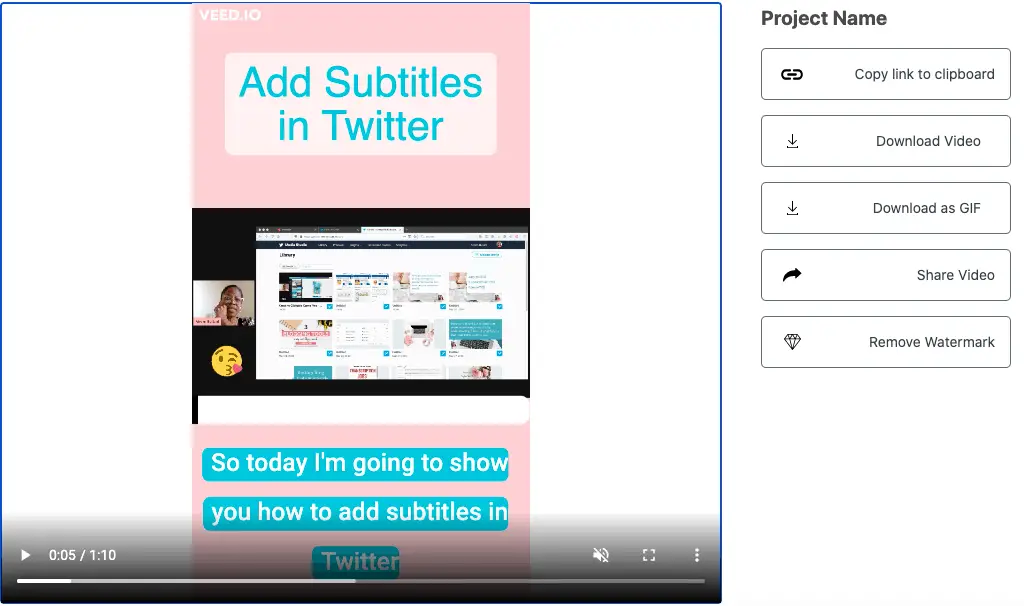
Veed is a super interesting application to help online marketers to add subtitles to videos.
It can feel a little bit glitchy when arranging the elements onto the project.
The only downside is that you may have to upgrade to the Pro version to truly enjoy all the features.
In case you only have a tiny budget and all you need are the SRT files then this next option is perfect.
5. Otter.ai
Unlike all the other 4 options Otter.ai is not specifically designed for creating SRT files for video.
It was actually designed for taking minutes of meetings. However, they do have the option available to record all kinds or audio.
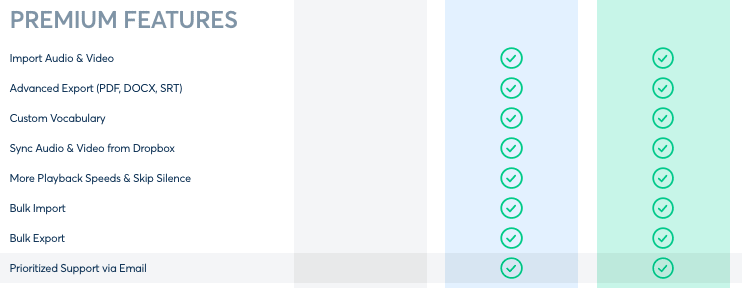
There is even the option to import videos to get them transcribed into text or SRT files.
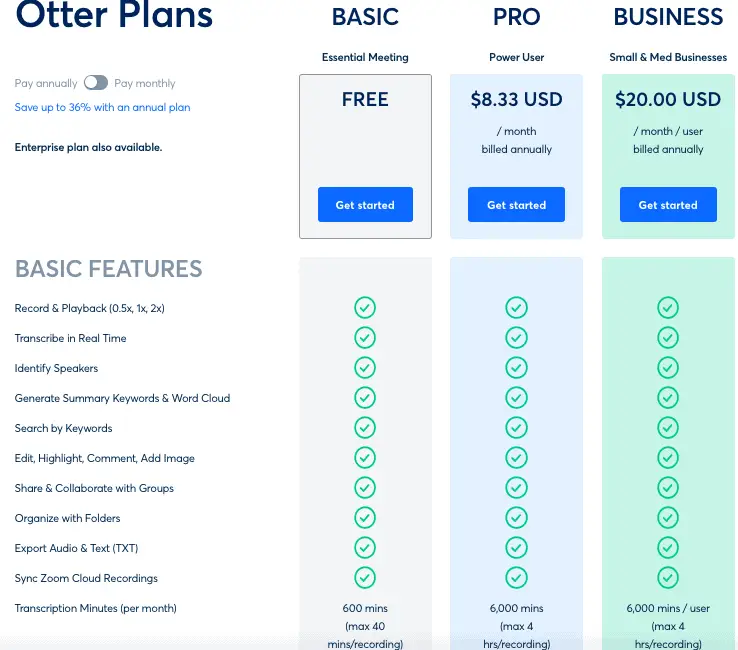
Here you can see what they offer in terms of importing video and downloading SRT files.
At only $10 a month it is worth the risk of giving it a try to see if this works to help you add subtitles to videos.
6. Kapwing
The final little solution on the list is a piece of software called Kapwing.
Compared to all the other options Kapwing has a very interesting proposition with a free forever plan and no watermarks.
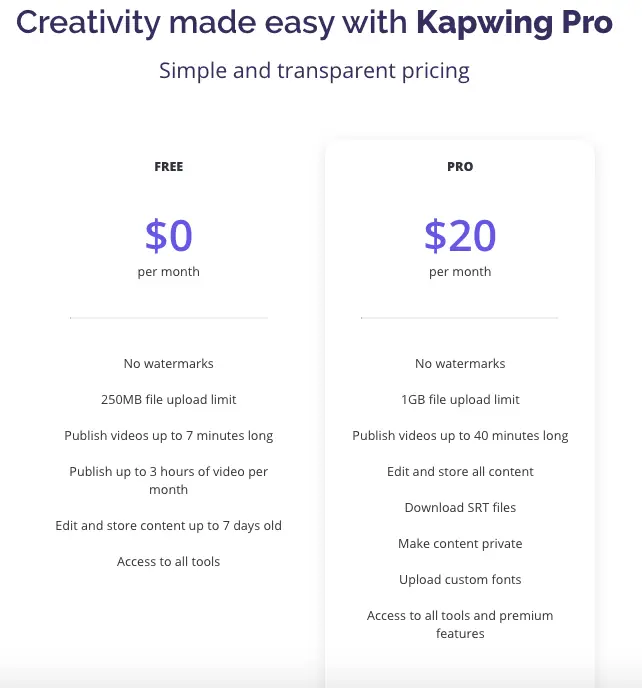
You can publish videos up to 7 minutes in length and the monthly allowance is 3 hours which, in my opinion, is very generous.
It is so simple to get started. Just click the ‘start editing’ button and you are given the option to start from a blank canvas or upload an existing video.
I chose to upload a video. I am brought to this screen to start the editing process.
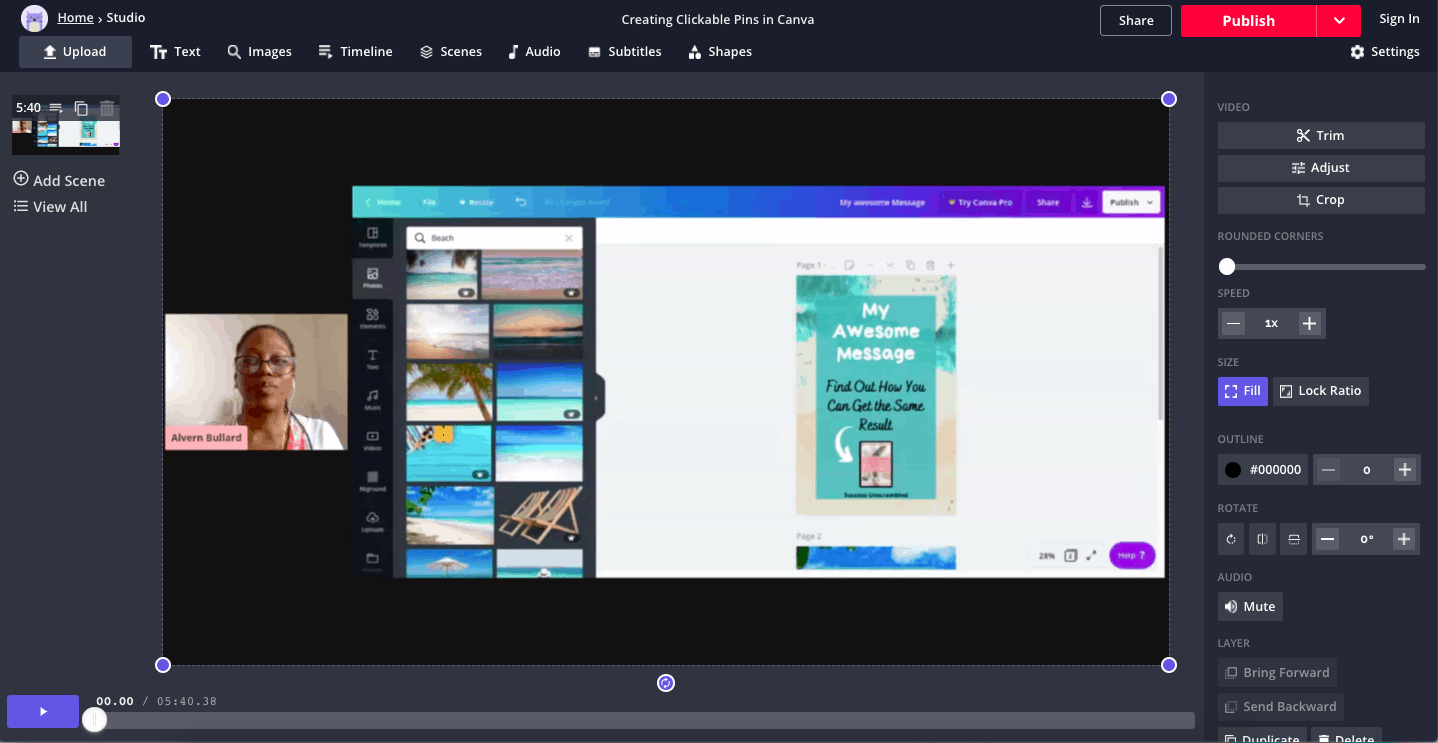
Here is a list of video size options that are available on the Kapwing platform.
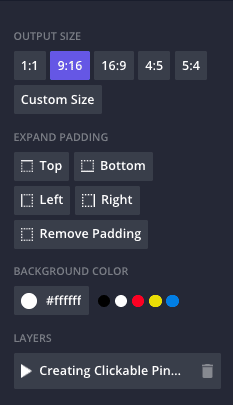
You will like the fact that you can also add your own custom dimensions just like you can with Canva.
I decided to go with a 1000×1500 size video. If you choose this option you will need to click on ‘lock ratio’ for the video to fit into the new canvas size.
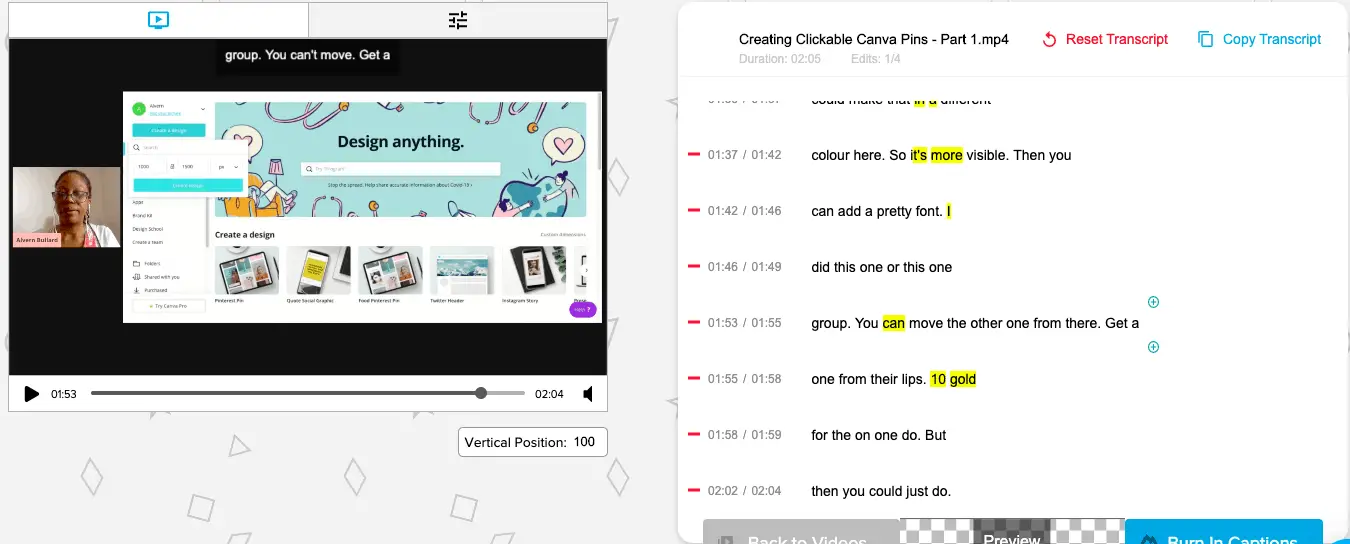
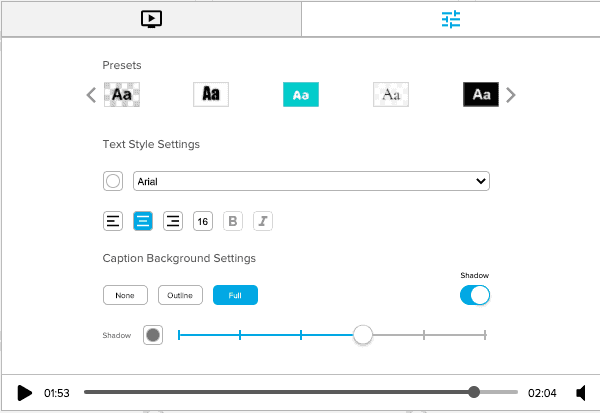
Add text on top as the header and head over to the subtitles tab to edit your captions.
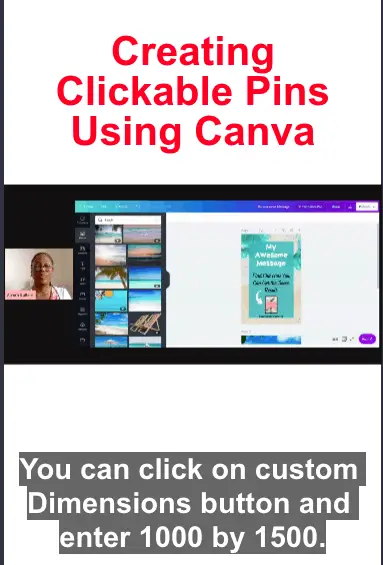
Although, the captions may not be 100% accurate, they are still near enough to perfect.
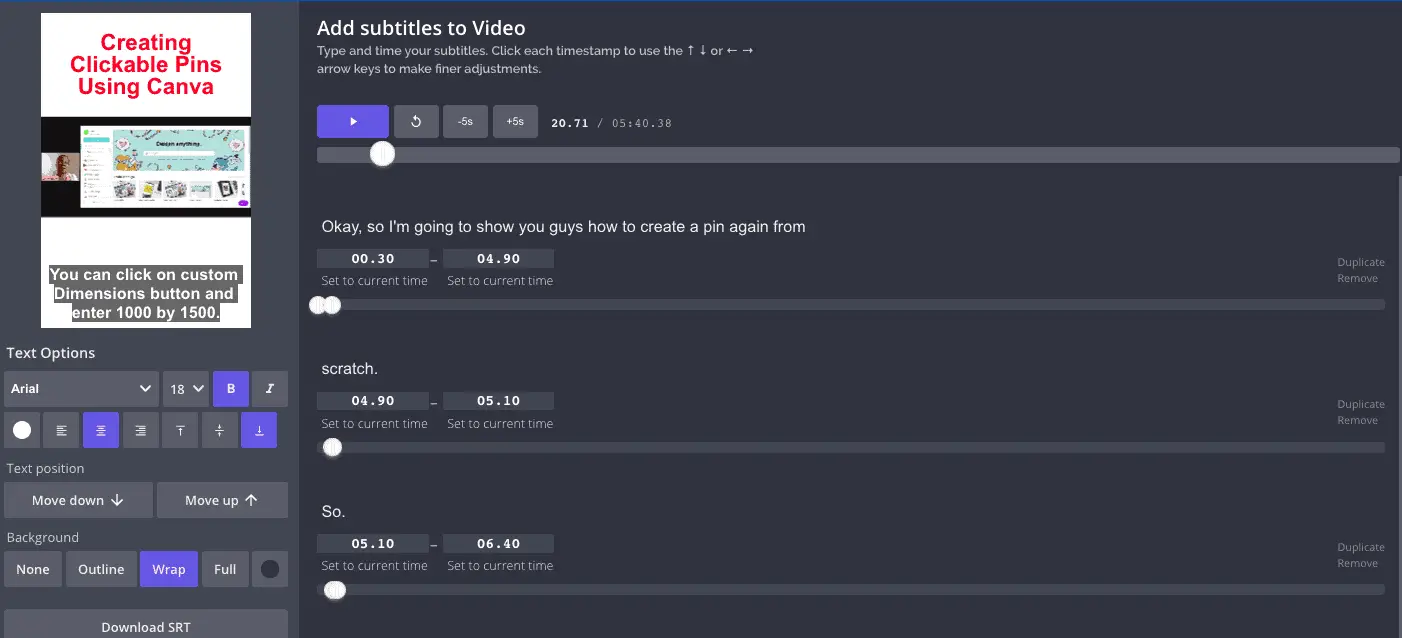
Once you are happy with the captions or subtitles, title text and style of captions (colour + background + location) you can go ahead and download your video.
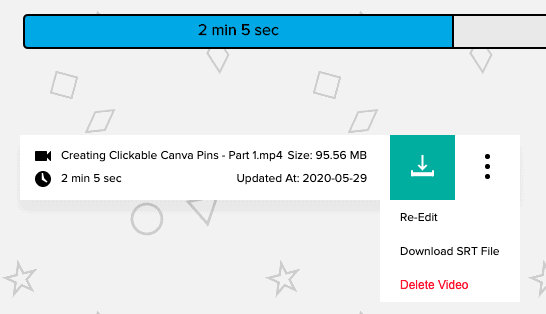
Here is what mine looks like after the video has been rendered and before I download it.
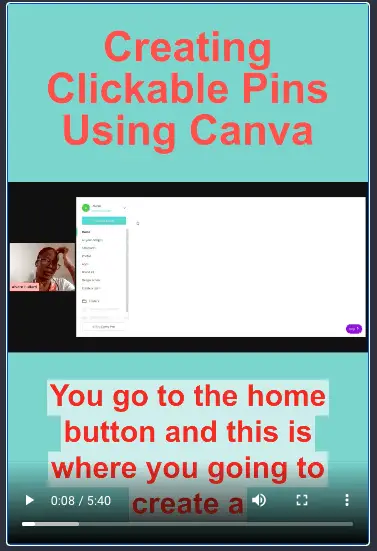
It gives you the option to download the video as mp4 or you can embed it or copy a link so that you can share it on social media platforms.
The catch here is that the video is now available publicly for everyone to see and that is why they give it to you for free.
Summary
What an adventure! If you are one of my regular readers or listeners you know that I like to give a lot of valuable information to reduce your learning curve.
To recap, you learned about the 5 social media platforms when it comes to video marketing and their requirements.
You also learned about the 6 different software applications that you can use to create SRT files.
Another cool trick that you learned is how to turn your existing landscape or 1920×1080 videos into vertical or 9:16 videos that are eye-catching.
All you need to do is to develop a 90-day strategy of how you can take advantage of this new technology and knowledge.
Get started with one video just to see how you get on and take it from there.
Over to you, what has been your experience when it comes to using video as part of your marketing plan?
Announcements
Remember to subscribe to the Success Unscrambled Podcast where you will be the first to hear what’s happening in the entrepreneurial and digital marketing world.
Your positive review of this podcast is vital to keeping it alive and running for the next 12 – 24 months so please leave a positive review for us on iTunes, Spotify or any of your favourite podcast players.
If you have been using social media for some time but you need to understand what’s working for you then find out how to do a social media audit here.
Are you trying to understand what others in your niche are doing with video marketing? Grab this resource on how to do social listening easily.
Need help mapping out a plan for your social media profiles for 90-days? Take a look at how to develop a 90-day social media content plan here.
My focus continues to be offering simplified marketing techniques for creative entrepreneurs so that they can skyrocket their visibility.
It means that they get more time to spend in their zone of genius and with their loved ones.


32 thoughts on “How to Easily Add Subtitles to Videos to Skyrocket Social Media Results”
Wow this article really covers it all. I do not have a LinkedIn and you have me inspired. Thank for sharing.
Melissa, I am so glad that this post has inspired you around LinkedIn.
I don’t make as much video content as I’d like, but adding subtitles are so important. This is a great guide, and with plenty of detail too.
Lisa, yes adding subtitles to videos are so important.
I like how detailed you are about video content and the different ways to do it this is so interesting and useful.
Jessica, I’m so glad that you liked it.
This is a really helpful list! As someone who never watches videos with the sound on, I am always aware of how important it is to have subtitles on the videos I make – yet, I never seemed to be able to figure out how to do it? Thank you for all these resources to make my life easier!
Tessa, it so hilarious to hear that you don’t watch videos with the sound on. I’m so glad that I have made your life a lot easier.
Can you say extremely detailed! All I need to do is come back here for steps to creating my perfect video. Great post!! I really need to try IGTV.
Serena, give IGTV a try I am sure you will not regret it.
Thank you! I have been wanting to do more videos but I have no clue how to do them. And yes, I do want to add subtitles, so this is perfect.
Amber, you are so very welcome.
I need to start paying more attention to subtitles on my videos. I sure would like more traffic to my website.
Tara, adding subtitles means that people will engage more with your videos.
Right now I am trying to improve my video-making skills. I have tried subtitles previously but it just didn’t seem to work out. But now, thanks to your post I feel I have enough information I need to put subtitles on my videos.
Priya, I cannot wait to hear how you get on with this new-found knowledge.
This blog in really much helpful and informative..watching videos without subtitles are completely useless and boring type..i just love to watch certain videos which have subtitles with..Thanks for sharing these ideas…
Abu, you are very welcome.
I have been thinking to start making videos. But I have very less knowledge on it. Although you have explained things very explicitly but can you please suggest within short time how to make a good video.
Mondidipa, I really wish that I can explain it all in a short time. However, have you ever considered going live on Facebook, IGTV, Twitter or any other social media platform? If not, then that is about the quickest way to create a video on social media.
Wow! This post is very detailed and impressive with screenshots of everything. I didn’t know that there were so many free services for video editing and uploading to the social media platforms.
Joanne, you will not believe it but I found another video editing platform yesterday which I hope to add to the list shortly.
Whoaaaaa I’ve never thought about this!! I don’t know why I thought the subtitles were just automatically created! gah! Thanks for sharing!
Heather, you are definitely hilarious. I really wish all subtitles were auto-generated as it will save us a ton of time as business owners.
This is an amazing idea! I had no idea about this.
Amber, I’m so glad that I was able to help you learn something new today.
Great advice! I’ll keep this in mind if I ever start to make videos.
Thank you for sharing.
Nyxie, you are very welcome.
This is what I need to add to my videos! Thanks for this helpful tutorial 🙂
Blair, you are very welcome.
Great tips! I have been thinking of maybe venturing on videos and subtitle is really a great idea. Love it!
Waren Jean, I’m glad that you are thinking of venturing into videos.
Comments are closed.