Podcast: Play in new window | Download (Duration: 26:04 — 36.6MB) | Embed
Subscribe: Spotify | Amazon Music | Email | TuneIn | Deezer | RSS | More
You’ve created some awesome video content but you are now wondering how to burn subtitles for Instagram videos.
The excitement of using video content to promote a small business has continued to increase over the last number of years.
If you are an introvert, doing talking head videos is one of the last things you want to do for your business.
Coupled with the fact that shooting and editing videos can take a lot of time. So adding captions to your videos just feels like an added burden.
If you can relate to this you are in good company. Here’s why…
Creating video content for your small business can be seen as a separate full-time job.
First, there is the need to come up with content ideas and if you are publishing to YouTube these ideas need keyword research.
Don’t get me started on the right equipment and lighting to get the most out of your video production.
To make matters worse, as a woman, you now need to find the best outfit as well as get your hair and make up done.
Finally, there is the burden of knowing exactly what you will say when you hit the record button.
Does creating and publishing video content need to be so stressful and overwhelming or is there a better way?
In this post, you will learn about the simple ways to burn captions into your video during and after production.
So that you can get your videos published in a much shorter timeframe and in a very organised fashion.

Is Using Video to Promote Your Small Business Worth It?
If you are still sitting on the fence hoping that video marketing will become a thing of the past then check out these insights.
Did you know that this year alone the average US consumer will have 9.5 video streaming apps installed on their smartphone?
I don’t know about you but I have over 100 apps, maybe closer to 200, and I can confirm that many of them are video apps.
Also, users arriving to an e-commerce site via a user-generated video are 184% more likely to make a purchase.
E-learning grew by 36% during 2020 and it is predicted to grow even more in coming years.
Here’s is a shocking statistic that you probably weren’t expecting.
89% of video marketers say that they get a good return on investment from videos.
Check out this one trend I noticed, 7 out of 10 event organisers moved their in-person event online during 2020, that’s 70%.
96% of current video marketers plan to increase or maintain their spend in the area of video marketing.
Interestingly, 69% of marketers who haven’t been using video are saying that they plan to use video going forward.
Finally, online viewers claim that they retain 96% of a message that they obtain from videos.
The bottomline of all these statistics is that video marketing is here to stay for small businesses.
The Video Creation Process
When it comes to getting captions for your Instagram videos we need to spend time looking at the different IG areas.
As you probably already know Instagram now have 6 areas where you can create and publish video content.
These areas include:
- Instagram feed
- Instagram Stories
- IGTV
- Reels
- IG Live
- Live rooms
Let’s spend some time looking at the requirements and restrictions for each of these areas to understand what is possible.
1. Instagram Feed
As you know the Instagram feed is a place where you can publish 3 different kinds of content. Which are:
- Single image
- Image carousel
- Video
As we are specifically focused on video the requirements to publish a video in your IG feed are as follows:
- Format – MP4
- Longest video length – 60 seconds
- Max file size – 15MB
- Maximum width – 1080 pixels
- Frame rate – 30 FPS
- H.264 codec
- AAC audio
- 3500 kbps bitrate
If you would like to test what this process looks like before creating a talking head video.
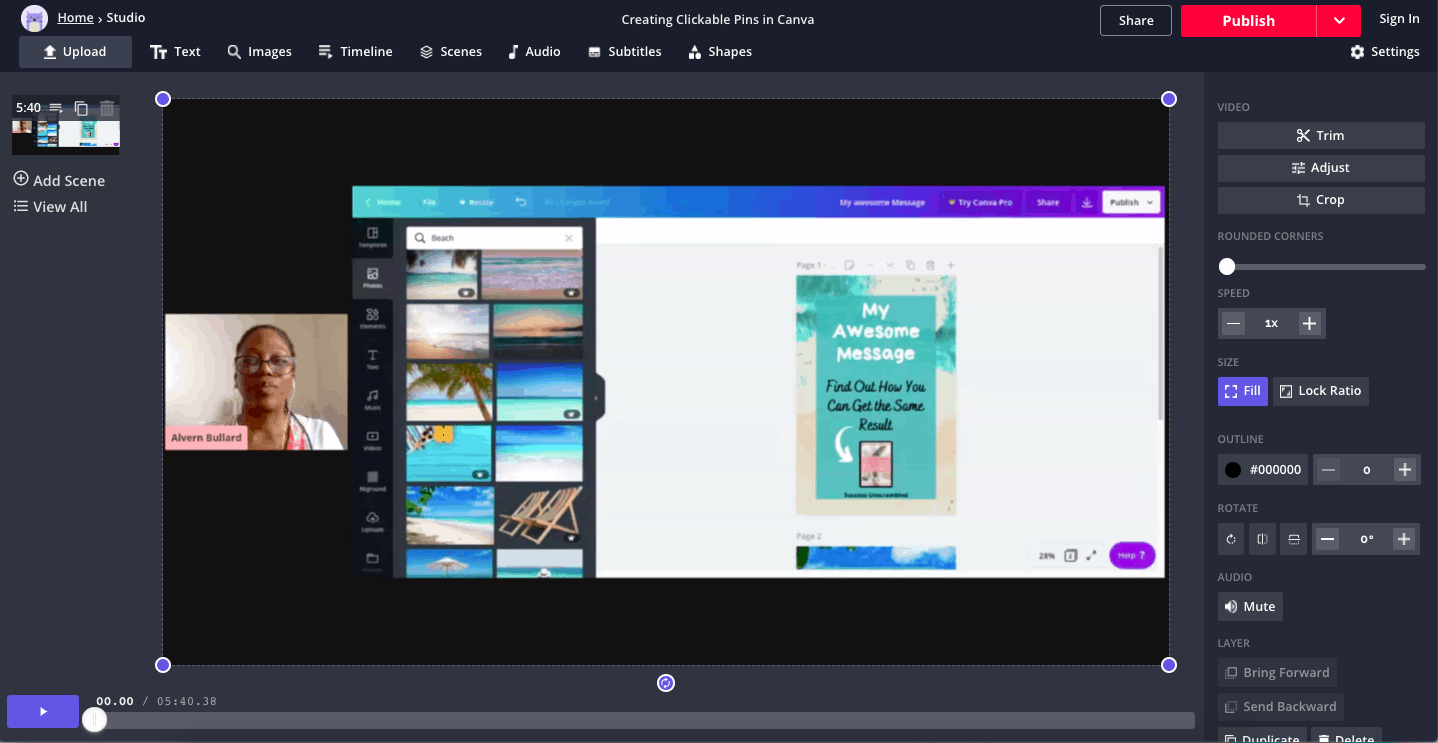
Head over to Canva (the free version is fine) and create a new design that is 1080 x 1080.
Using one of the stock videos, spend some time creating a video that is up to 60 seconds long.
Give it a name and upload it to your favourite IG scheduler and write some captions, add hashtags and publish it.
I did one recently and you can see an example of it here.

2. Instagram Stories
IG Stories can be challenging because although you can now auto-post to IG stories the creation process is not simple.
First, let’s look at the required format of videos created for Instagram Stories.
- Format – MP4 or MOV
- Max length – 15 second per slide (up to 2 minutes per story – 8 slides)
- Aspect ratio – 1080 x 1920 (9:16)
- Video size – up to 14MB
While the list may not seem very long the catch is to make sure that you add a few engaging items in your Stories.
To put this to the test I suggest that you head over to Canva and create a test IG Stories video.
When you are in Canva create a new design by choosing Instagram story from the drop down list.
Grab a portrait video from the complimentary video stock library inside Canva.
Reduce the size to 15 seconds and when you are happy download it and upload it to your favourite scheduler.
If you choose to auto-post to IG stories ensure that you add the necessary hashtags and call-to-actions on the video.
3. IGTV
In one sense IGTV is probably the best area for you to publish videos if you are an introvert.
You have the ability to create the perfect talking head videos in advance then publish them as a series on IGTV.
Before digging further let’s look at the basic IGTV requirements.
- Aspect Ratio – 9:16 (preferred) and 16:9
- 10 Minute Video – Max 650MB
- Maximum length – 15 minutes from mobile, 60 minutes from the web
- Max File size – 3.5GB
- You can add a link in the description or caption
- These videos don’t expire
- File format – MP4
- Pre-recorded videos are fine
One key difference that makes IGTV videos differ from those in the IG feed and Stories is the need to add a cover image.
If you are really good at video editing you can try to create a test video in Canva that is 2-3 minutes in length.
However, you can wait until we get to the section discussing all the apps that you can use to create videos for IG.
4. Reels
Up next is Reels which I see as a public cutdown version of Instagram Stories in one sense.
The major challenge with Reels compared to IG Stories is that it doesn’t disappear after 24 hours.
Let’s look at the specific requirements for a Reels video.
- Format – 1080×1350 or 4:5
- Thumbnail size – 1:1
- Max length – 15 seconds
- Entertaining – lol!!
If you haven’t noticed it yet, Reels is one of those videos that is quite a challenge to create.
Yes, you can choose not to try creating content for Reels until you get better at video creation.
In case you need some inspiration to create your first IG Reel, here are 3 examples for you.

5. IG Live
One of the most flexible types of videos on Instagram is the ones where you go live.
If you are an introvert this may scare you to death and you may even find it a little bit off-putting.
However, the beauty of IG Live is the fact that you can go live with a friend or colleague.
You also don’t have to worry about video formats since you will be using the native IG app.
All that is left to do is pick a topic, choose a date and time, get dressed and show up to add value.
Here are a few things to consider before going live.
- Your video will disappear after 24 hours (unless you save it to IGTV or download it)
- It will stream real-time in your feed
- Potential viewers are given a sense of urgency
- You will be able to engage with viewers while streaming
- Comment moderation and turning off comments will be available
- Announcing in advance will increase attendance
- It can be up to 60 minutes in length
- Vertical video is the preferred format (9:16)
The fact that your video will disappear after 24 hours can be a bit discouraging but consider this.
If you made a mistake or you are unhappy with it then it will be gone after 24 hours.
Instagram live and Live rooms are probably the only two areas of IG where you are unable to use an external app to go live.
I recently went live on Instagram with a friend and you can check it out here.
6. Live Rooms
At the time of writing this post, Live Rooms is a feature that was recently released on Instagram.
In fact, this new feature is technically speaking an addition to the existing IG Live.
Previously, when you went live you only had the ability to add one other person to the show.
Now you have the option of adding up to 3 friends with Live Rooms.
The way I see it, this is good news for anyone who is an introvert because now you can have 3 other people supporting you.
There is one catch with this feature which is that the 3 other accounts need to be already following you.
You also need to be following those other 3 accounts.
7 Apps to Burn Subtitles for Instagram Video
Now that we have covered all the areas inside Instagram where you can create video content.
Let’s spend some time looking at apps to help you create those needed captions.
Firstly, these applications are in two broad categories.
a. You can record the video in it while captions are produced in the background.
b. The other option is to create the video ahead of time then get the captions burnt in after the fact.
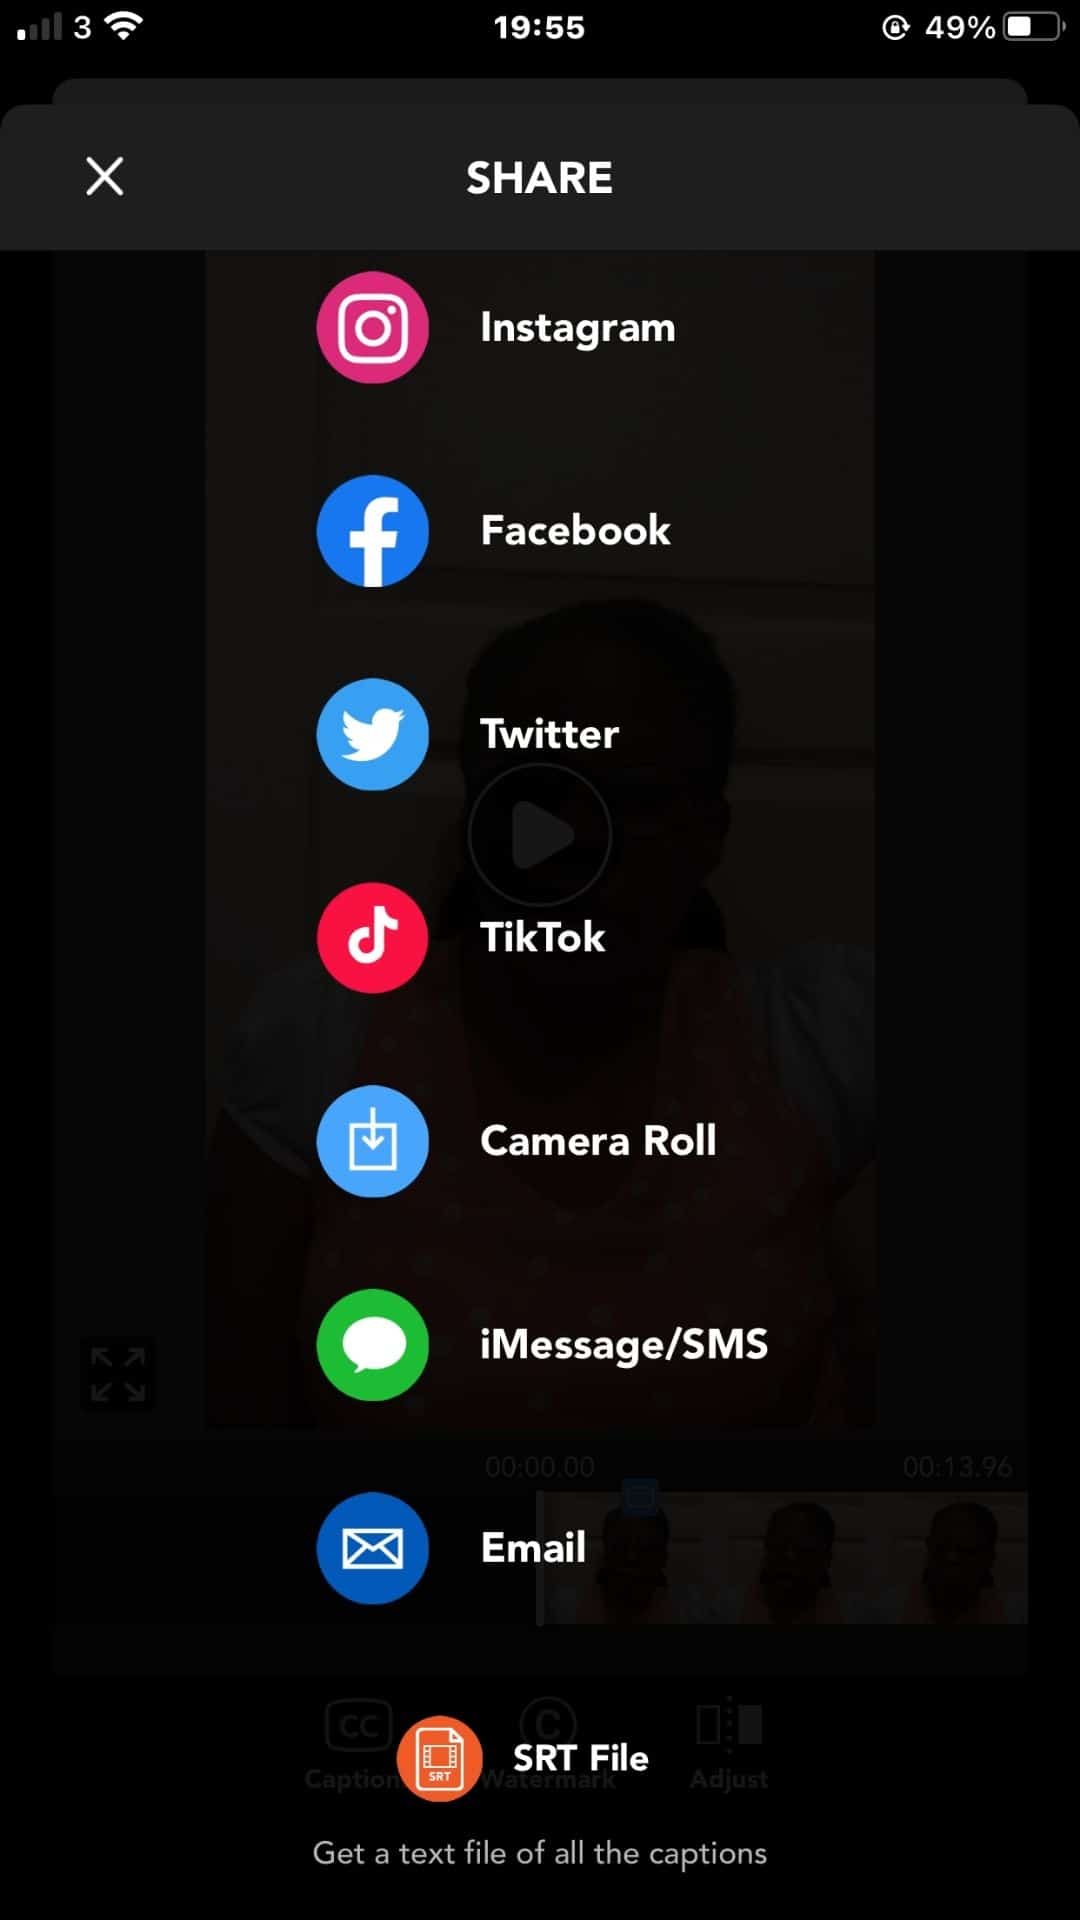
1. AutoCap
When you want to burn subtitles for Instagram videos AutoCap is an app that can do just that for you.
Simply download the app from the app store and start using it right away.
It will give you the option to select a video from your camera roll or you can literally record the video from scratch right inside the app.
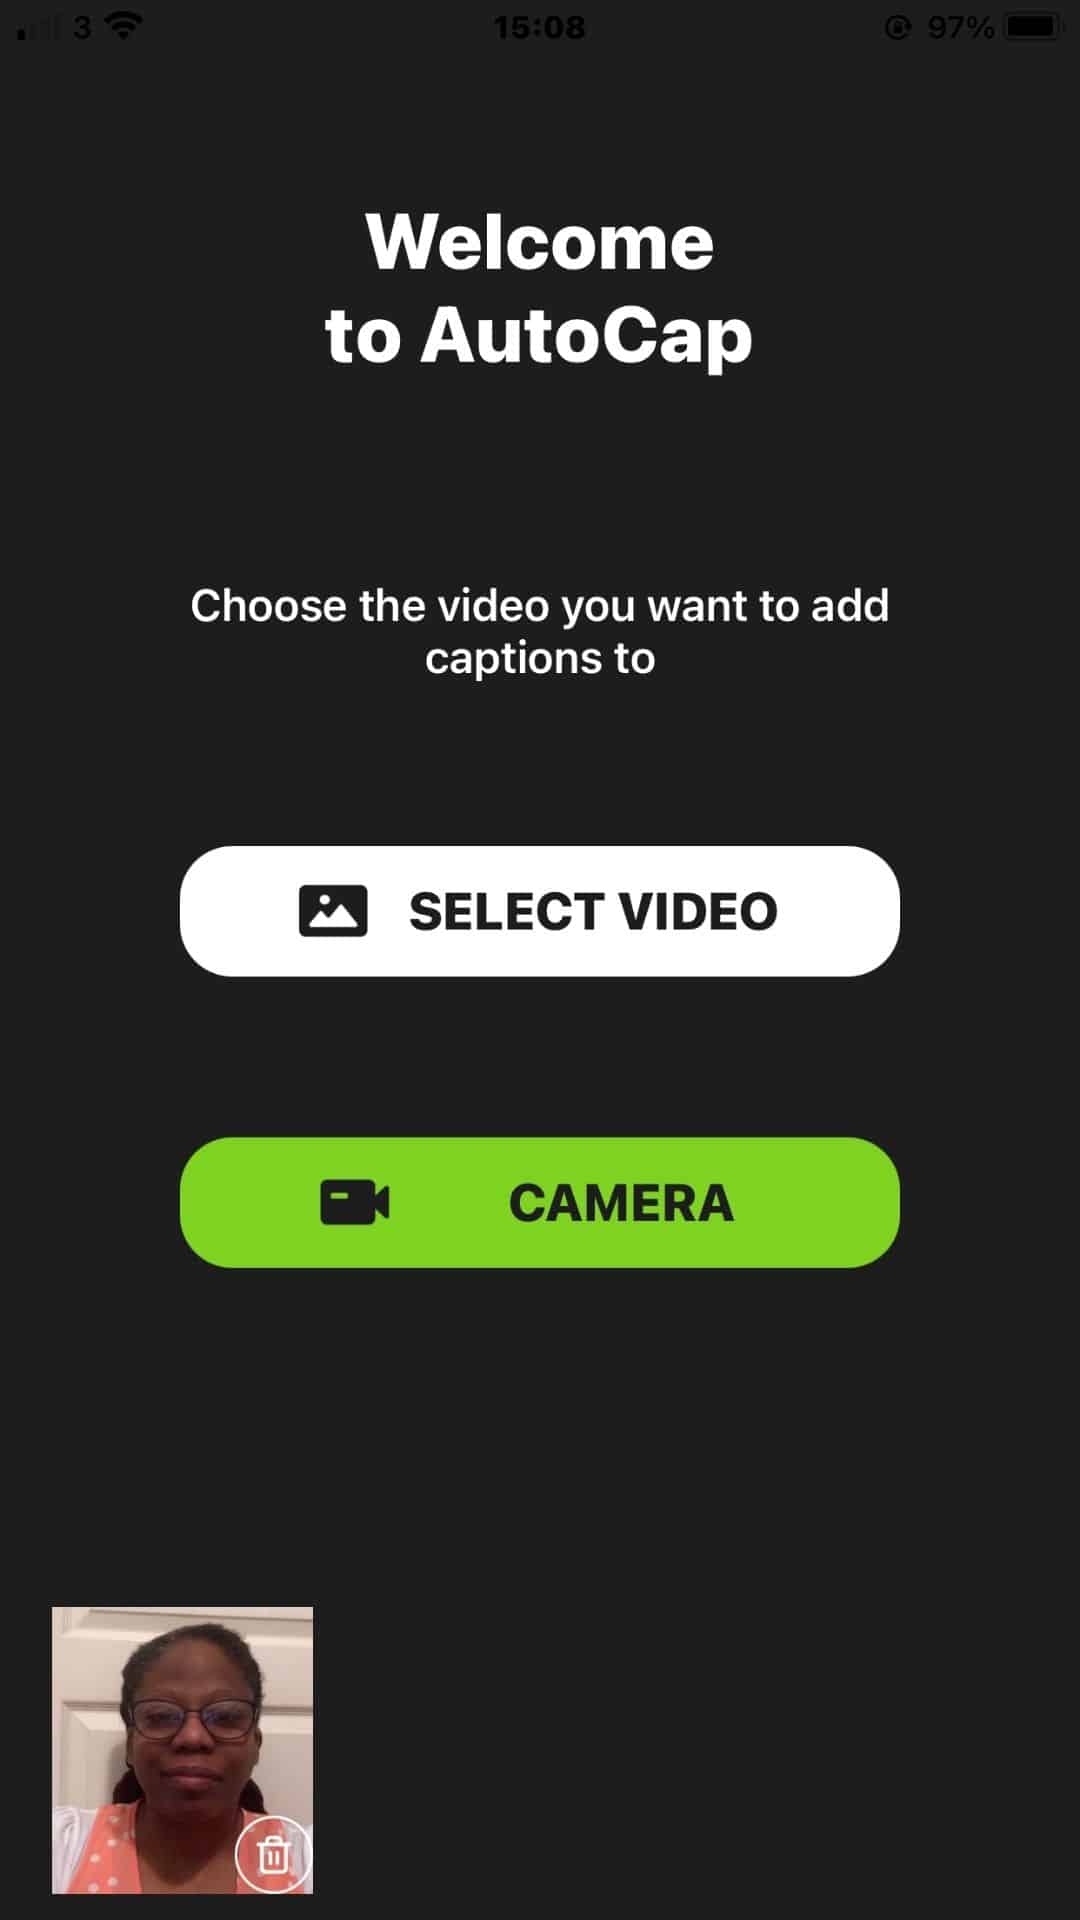
Either way AutoCap gives you the ability to add subtitles to your Instagram video up to one minute in length for free.
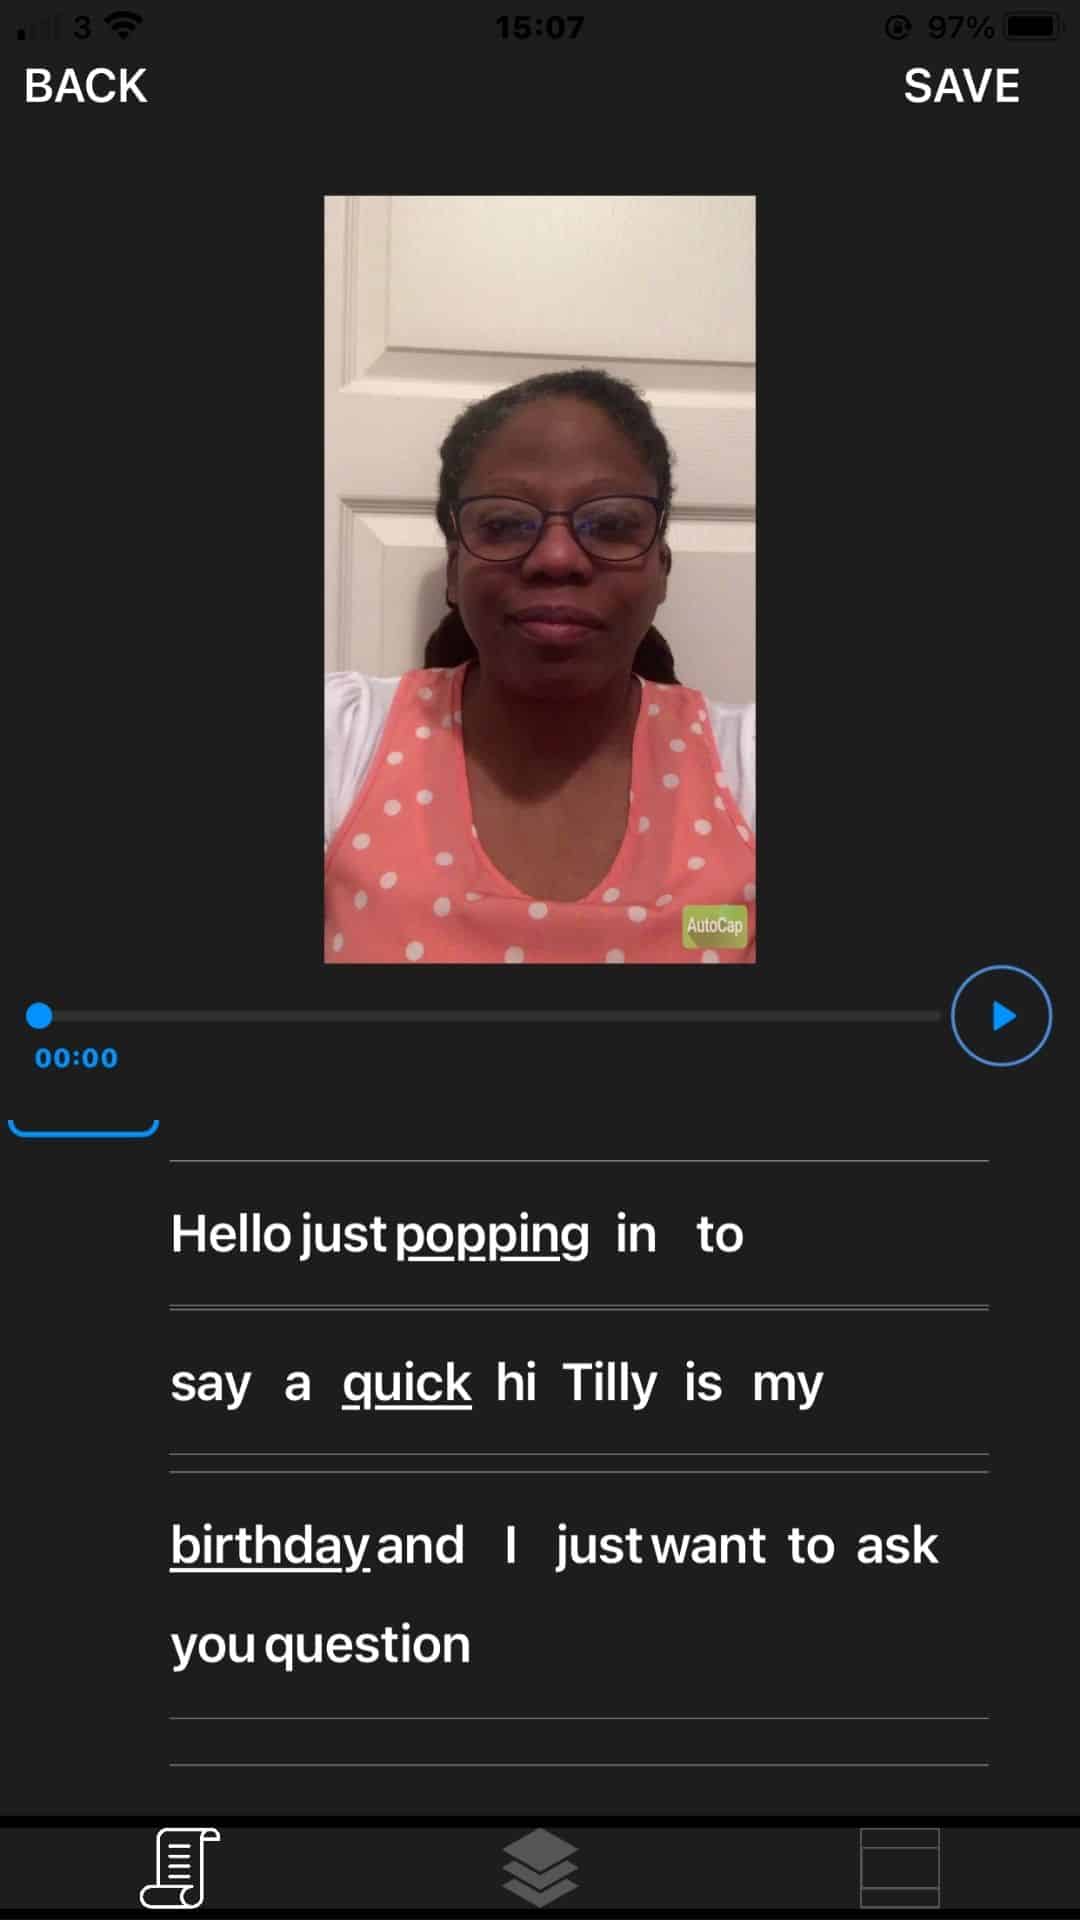
I must say that I think the captions are kind of cool because they really stand out compared to other applications.
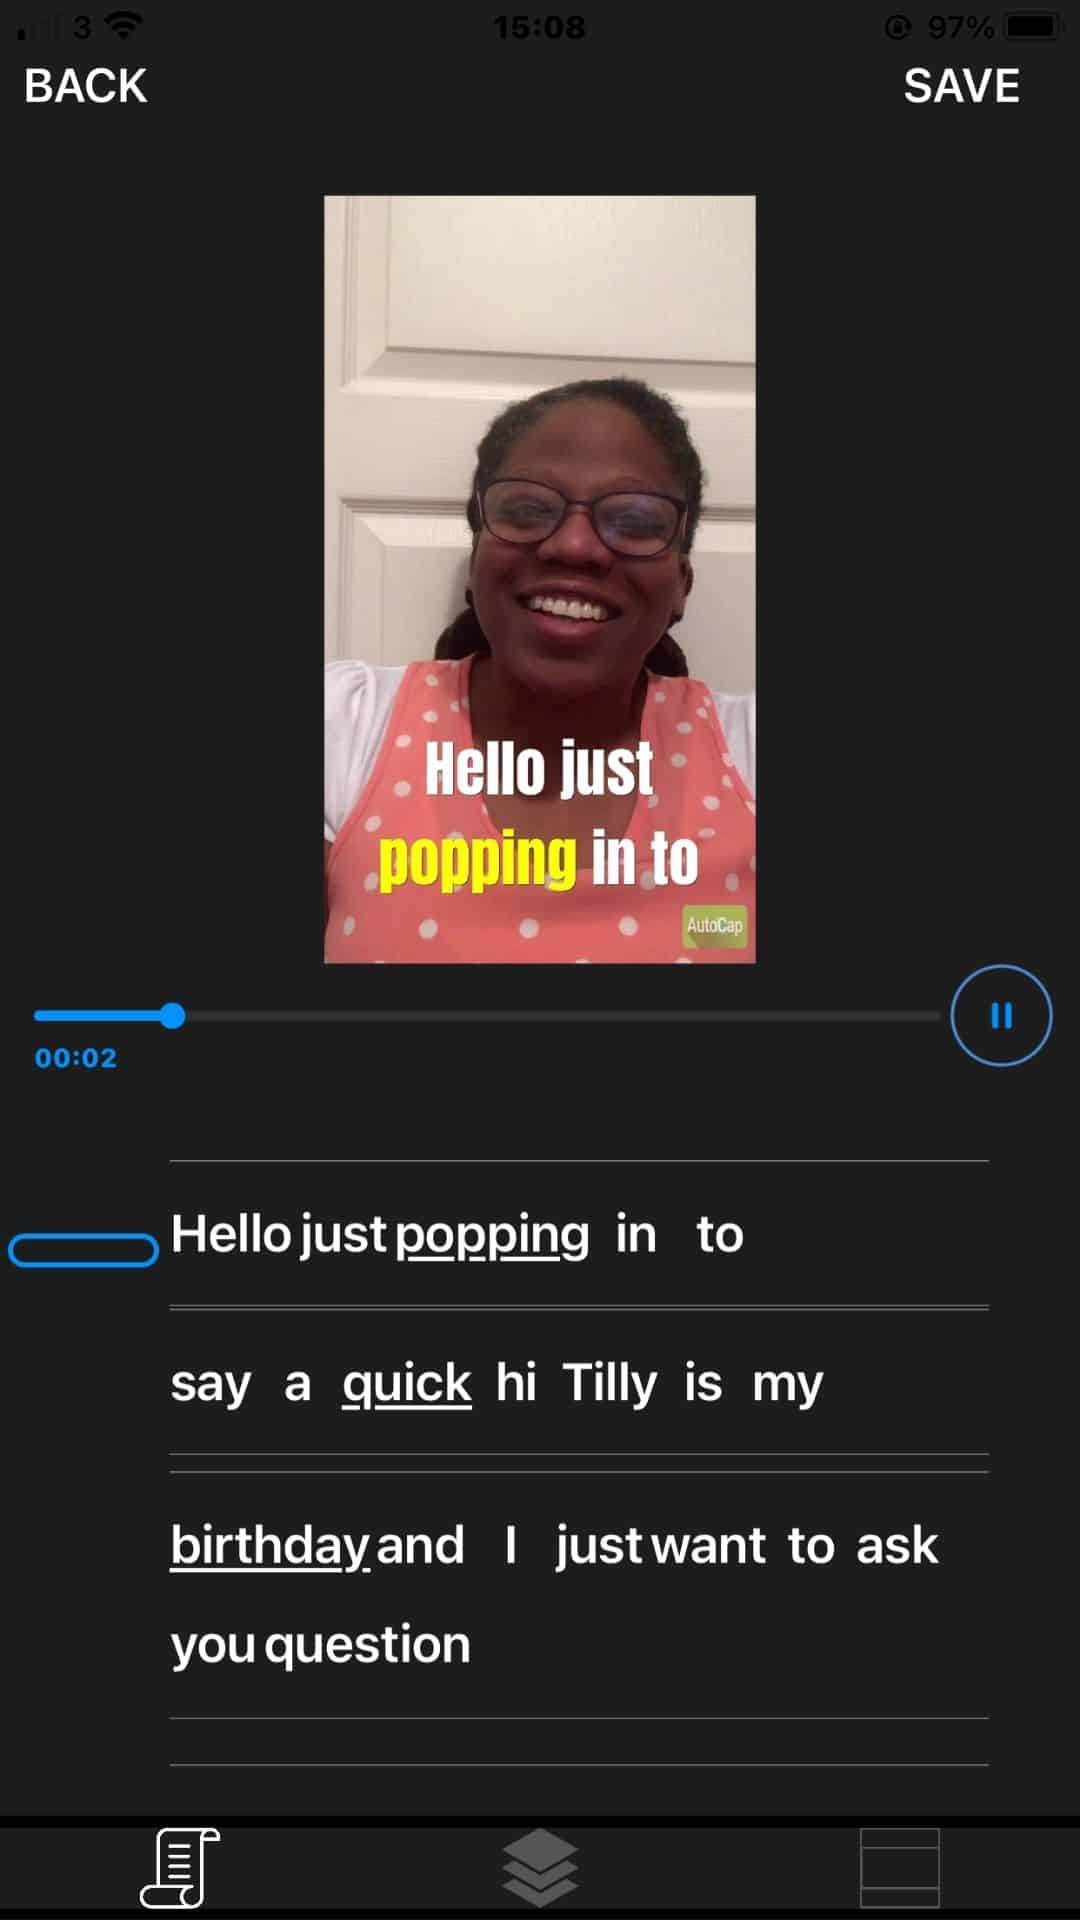
Best of all you can save the video to your phone and happily get on with the rest of your life.
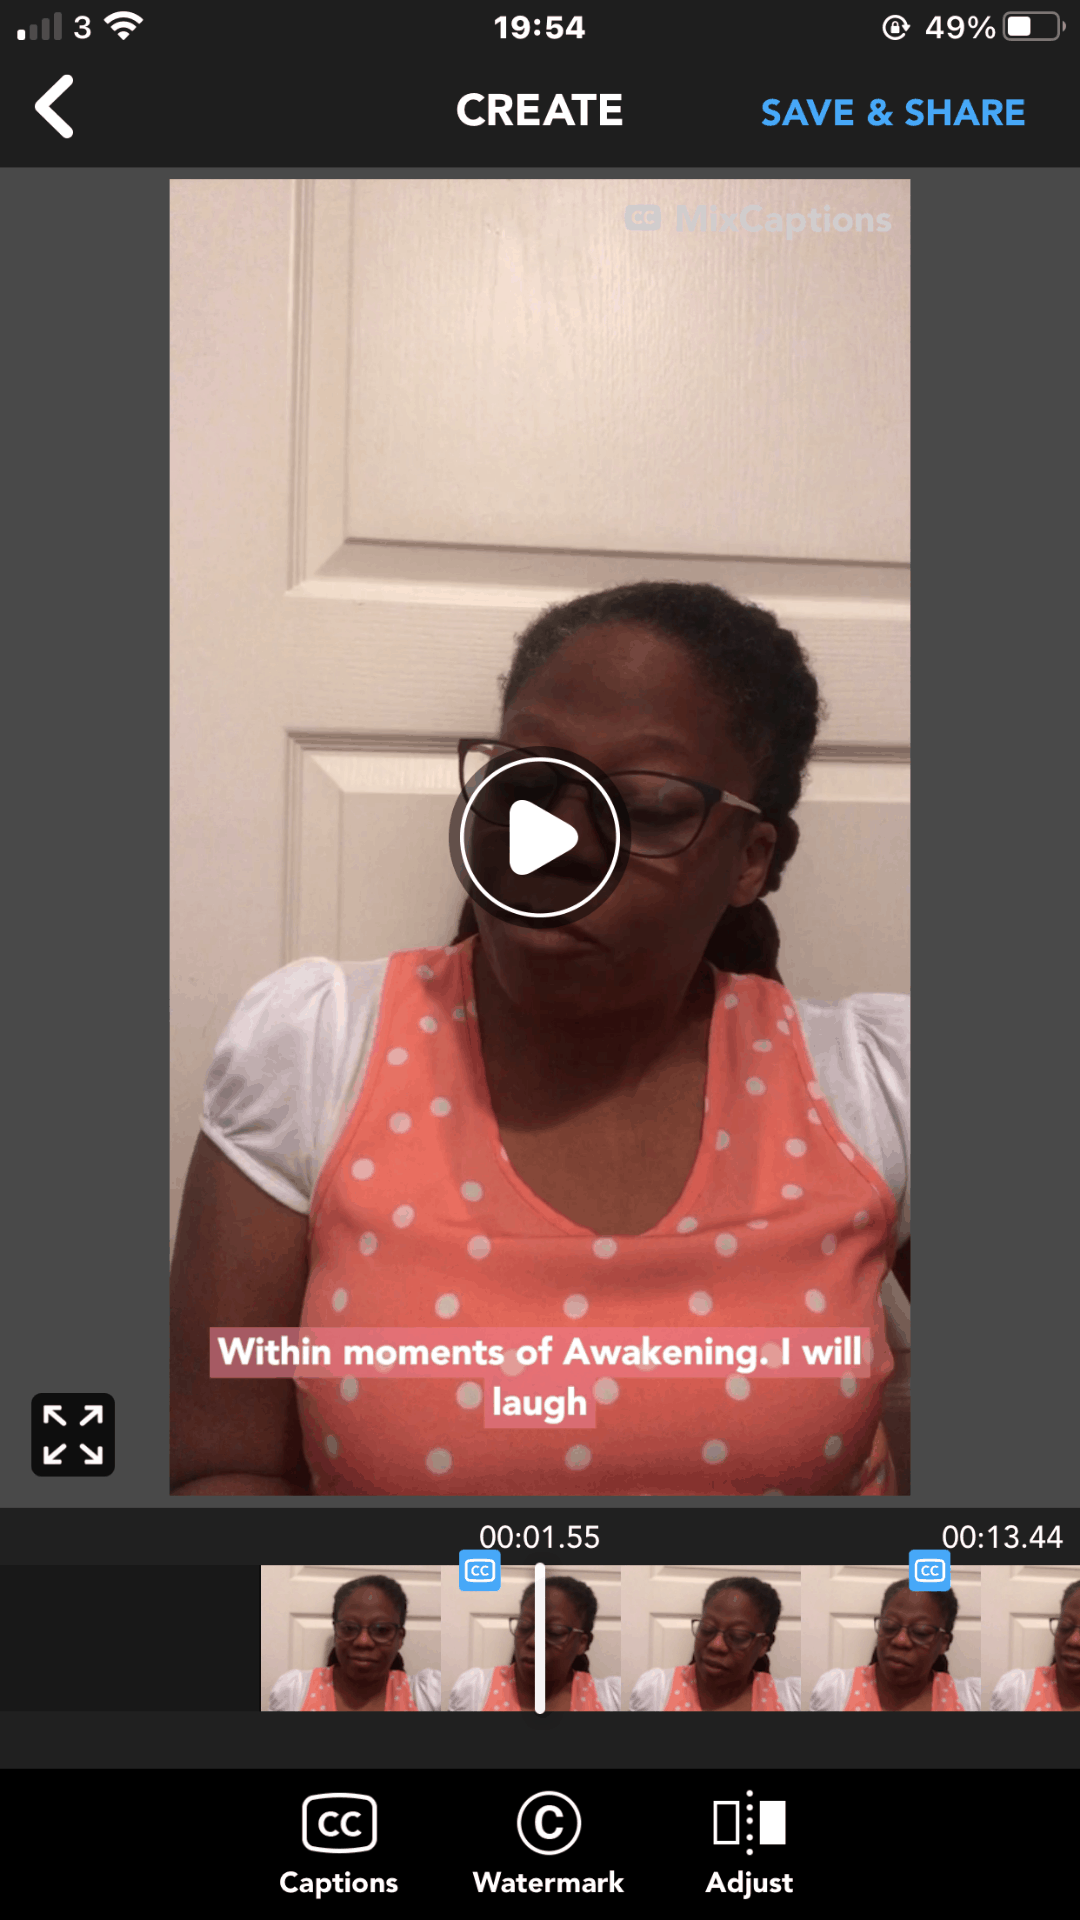
2. MixCaptions
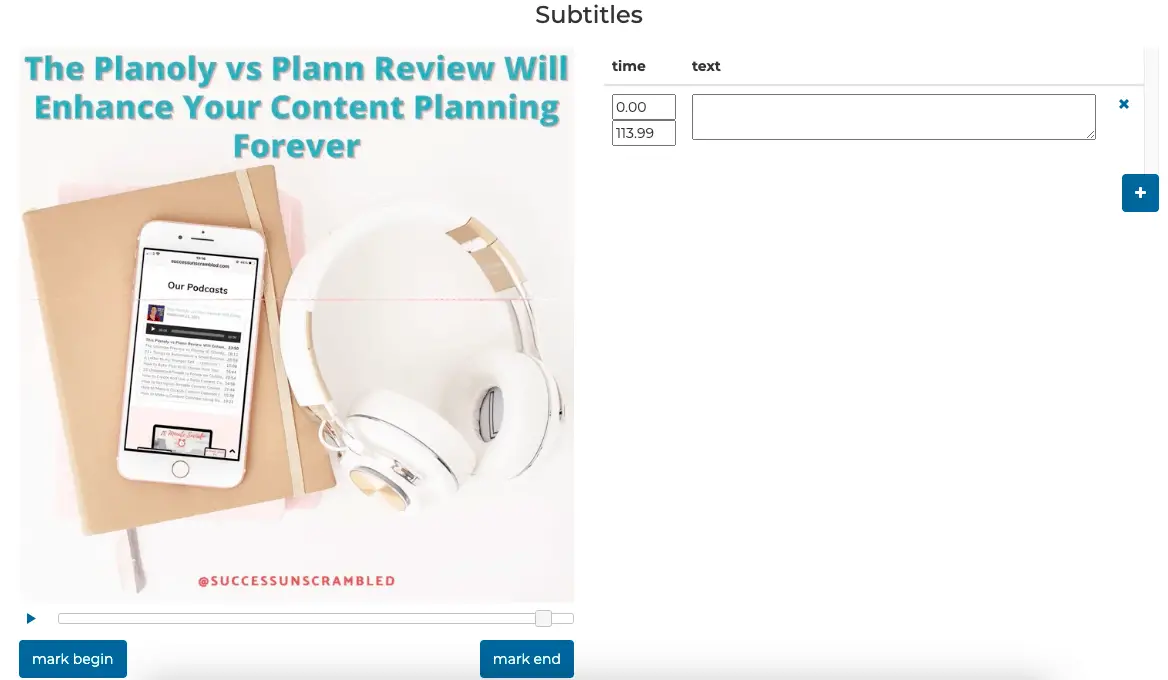
If you already created a video but you need to quickly add captions to it then MixCaptions is a great app to do so.
Several times after creating a few short videos for Stories I wanted to quickly create captions.
In those scenarios I used MixCaptions to seamlessly add subtitles to my talking head videos.
See the screenshot below for an example of what it looks like in reality.
You will be happy to hear that they offer several options when it comes to downloading the content.
There’s even the option to download the SRT file as well.
3. Crop.Video
Another interesting application for creating captions for IGTV videos is Crop.Video.
It is a web based application which comes with three pricing plans.
As you will soon realise there is a free version available so that you can give it a try.
The downside of using this platform is that it doesn’t autogenerate subtitles for you.
You actually need to type them in yourself.
However, if you are looking to create snippets from a longer video or you want to turn a square video into a vertical one.
Crop.video can help you achieve both of these requirements.
4. Headliner
Many podcasters are familiar with using Headliner to create audiograms for podcast episodes.
However, Headliner can also be used to create captions for videos as well.
The good news is that it is available both on desktop and smartphone which means that you can create the video on your phone and upload it to get captions straight away.
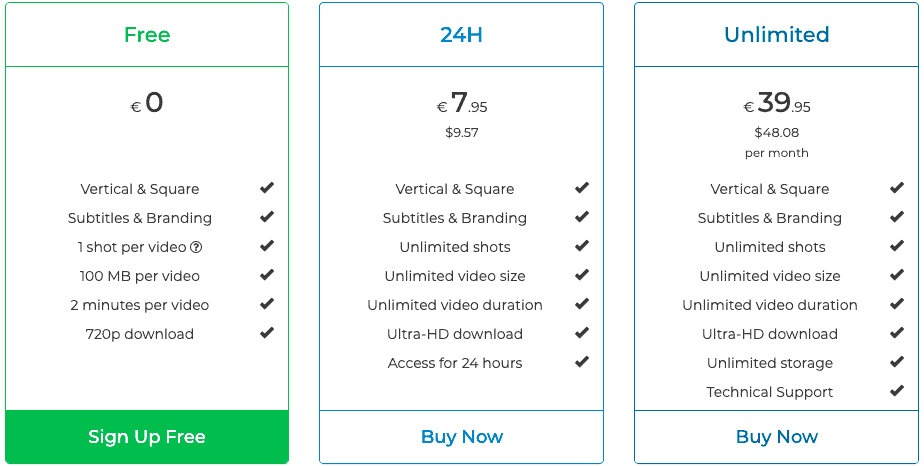
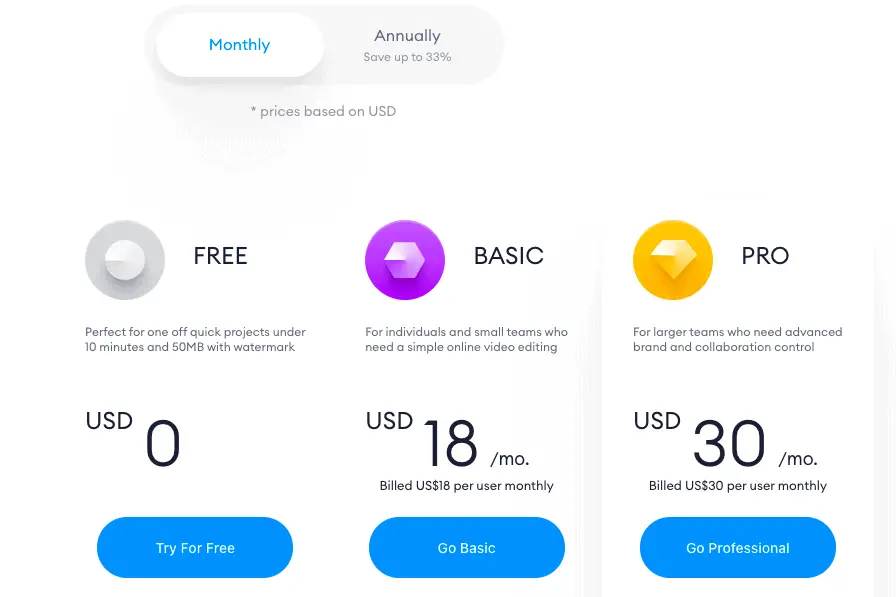
In terms of pricing, Headliner comes as standard with three pricing plans with the option to choose the free forever plan.
The key advantages of the mid-range plan is that you get to create 10 videos a months with unlimited transcriptions, reusable brand templates and custom watermarks.
All this for only $10 a month.
Here’s a screenshot of what it looks like inside of the desktop version of Headliner.
I must admit that the free plan is very generous because you get up to 10 minutes of transcriptions every month.
Plus you have the ability to download up to 5 videos without watermarks and the remaining unlimited videos with the Headliner watermark on them.
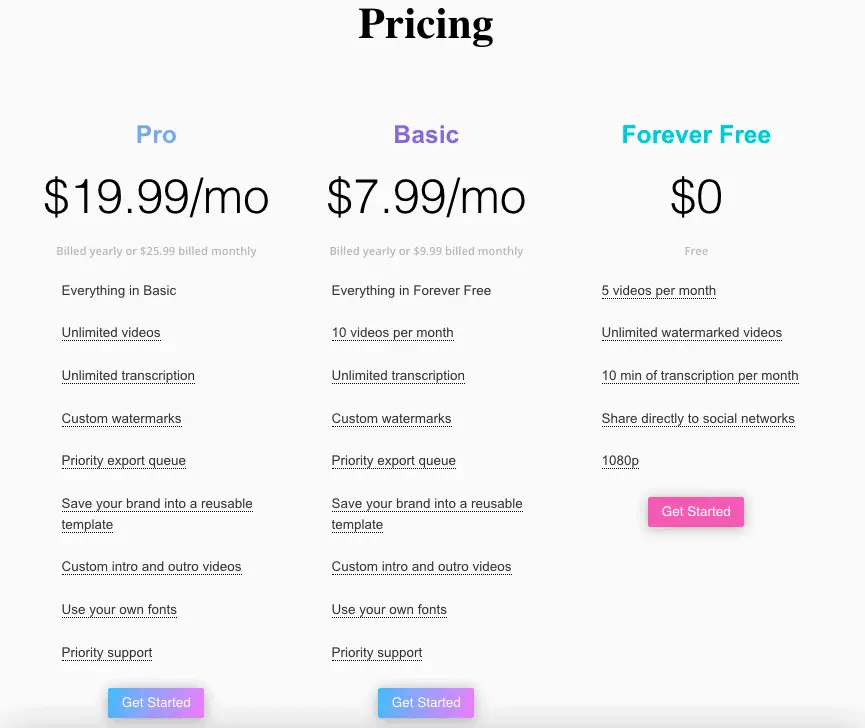
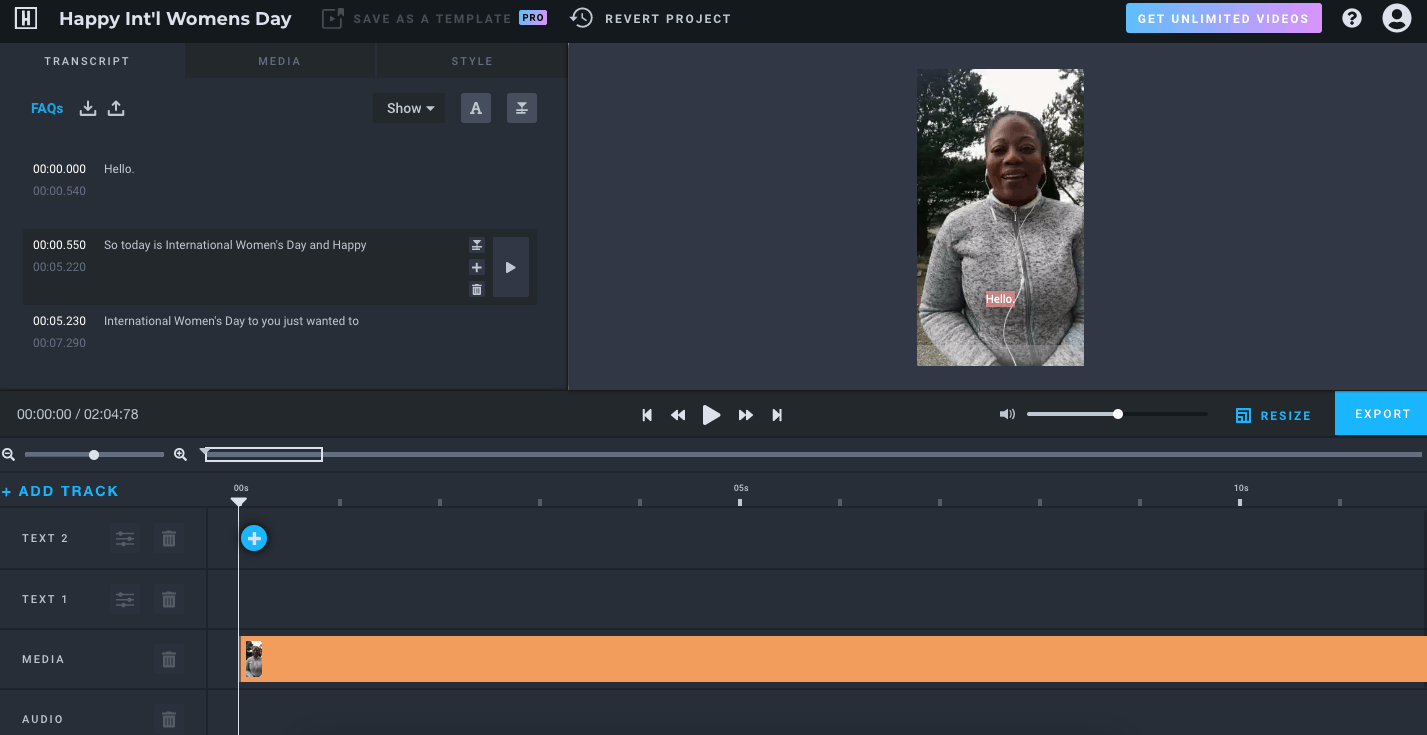
5. ClipScribe
Another cool web application to burn captions for Instagram videos is ClipScribe.
When compared to Headliner, it comes with three standard plans for users to choose from with the lowest plan starting at $10 a month.
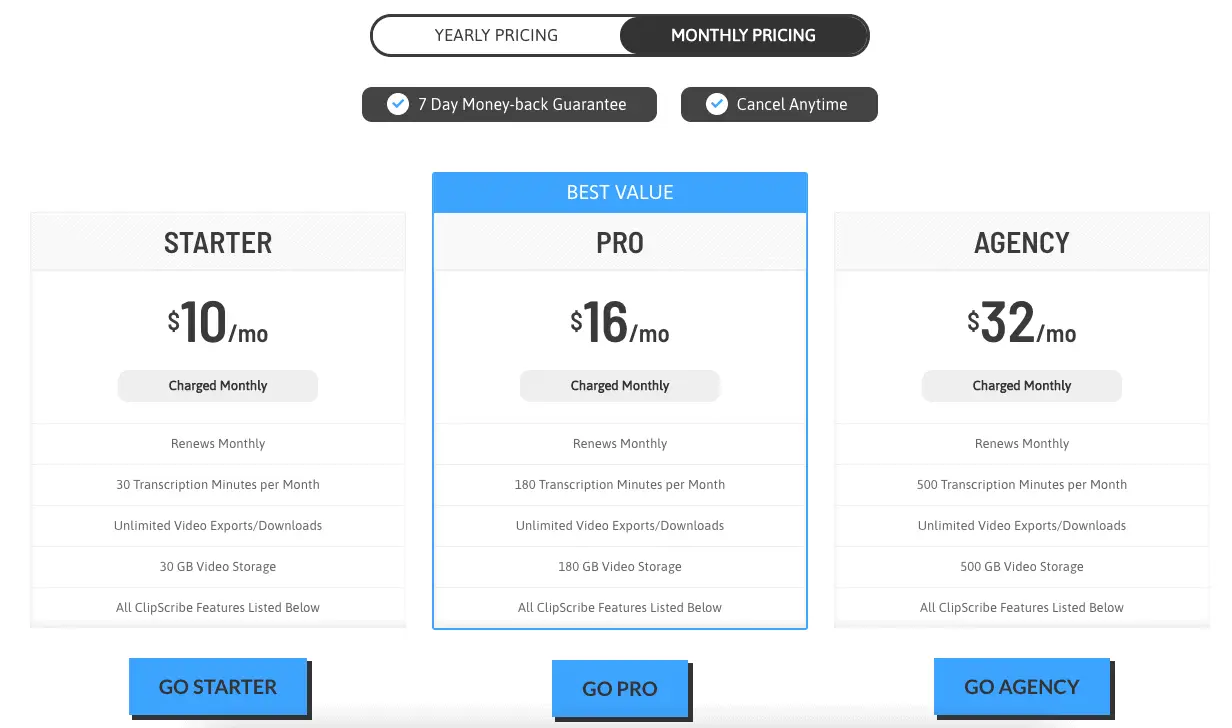
The ‘Starter Plan’ gives you 30 minutes of transcription every month but there is a small catch. These minutes are counted when you upload a video.
So, if you have a 10 minute video and you only need 1 minute of it transcribed you are better off trimming the video down to 1 minute before uploading it.
Some really cool features of ClipScribe include:
- Multiple video layouts
- Automated subtitle or caption creation
- Ability to add logos, emojis and images
- Custom countdown creator
- Attention-grabbing headlines
- Save your design as a template
- SRT import/export
- Available in 17 languages
You will have the ability to easily resize your videos and export them in various formats and versions for use on Instagram.
6. Veed
Veed is another application I came across recently and their pricing combined with video allowance looked way more attractive when compared to the other options.
There is one small catch that I noticed before making a purchase. Unless you are on the Pro plan the maximum video size you can upload is 50MB with a watermark.
A great service that’s available to compress videos is this one.
You may have a video that is 5 minutes long but the actual size is over 100MB which is a bit disappointing.
After uploading your appropriately sized video into Veed, you will be presented with this screen.
Quick note: You actually have the ability to record a video from scratch right inside the Veed application.
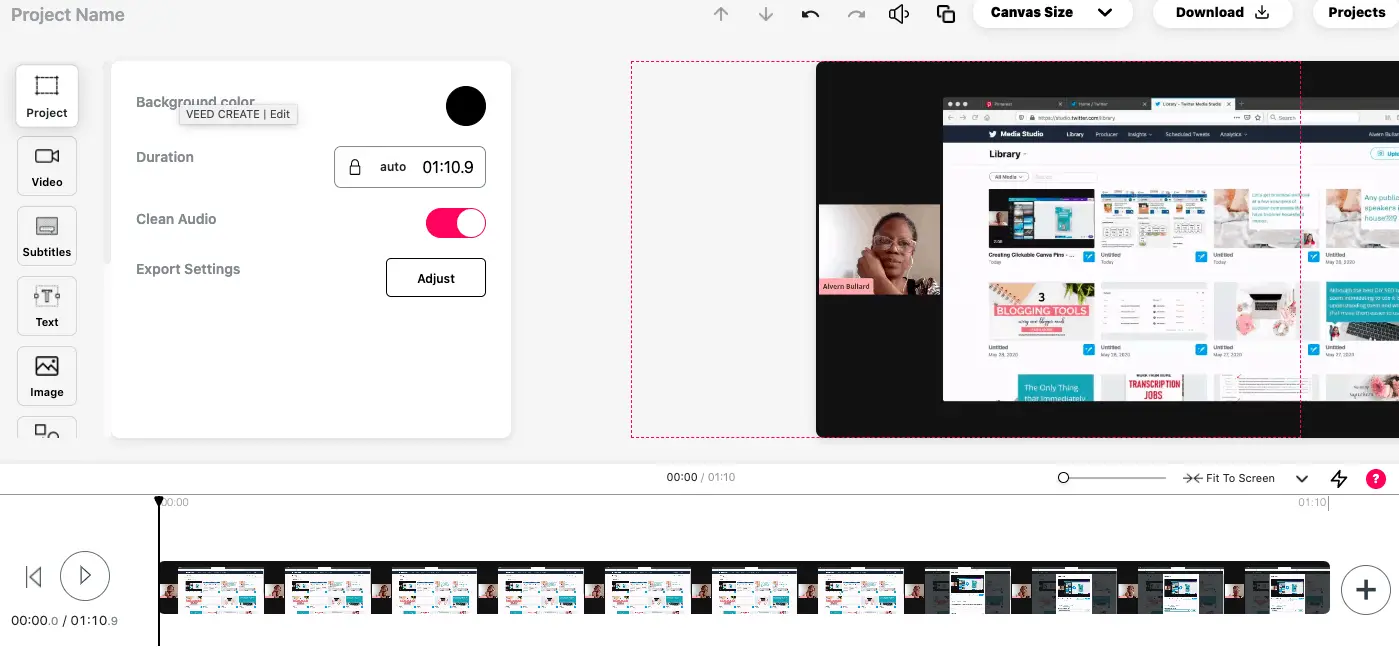
I am like a kid in a candy shop when it comes to testing new software and I already clicked the clean audio button just to see what happens.
In terms of video size options there are 11 available including one size for TikTok.
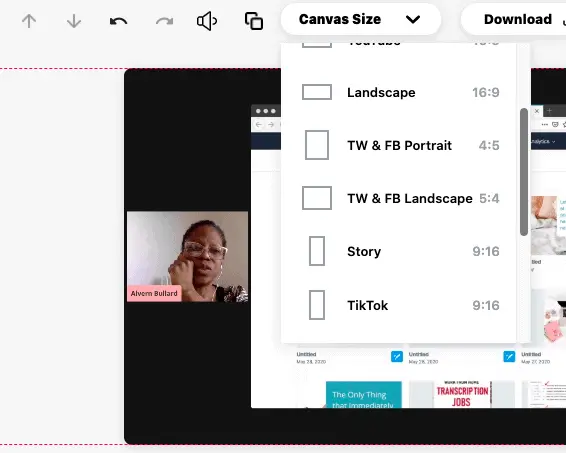
Veed appears to be a proper video editing software that also comes equipped with its own timeline.

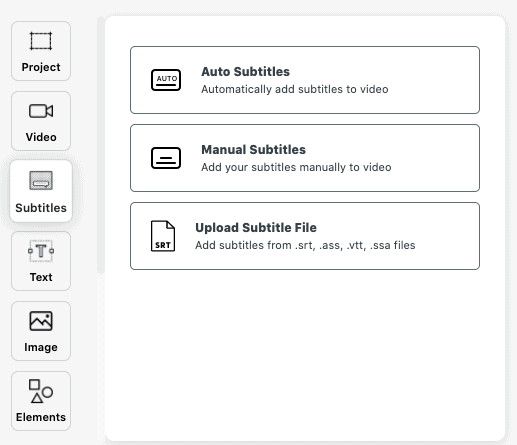
You get the option to do auto-generated subtitles, input them manually or even upload your own SRT file.
In one sense the application seems to come with a ton of options like adding emojis, progress bar, soundwave and shapes.
The ability to add your own images and brand elements is also available.
If you want to take the video and create a different size simply duplicate the project and adjust accordingly.
When it is time to download your video you are given the option to download it as a video or animated GIF.
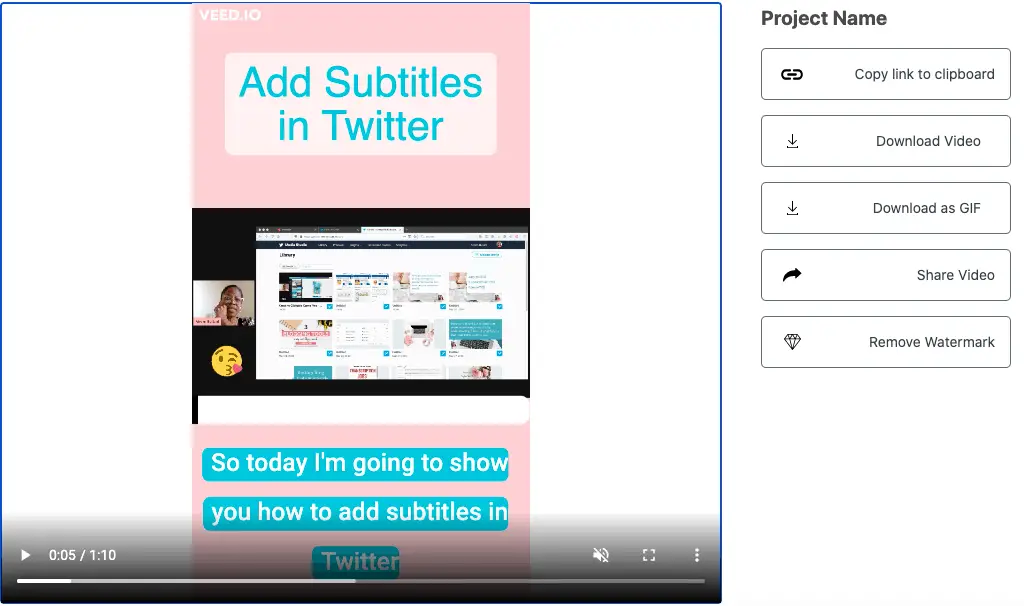
Veed is a super interesting application to help small business owners to burn captions for Instagram videos.
It can feel a little bit glitchy when arranging the elements onto the project.
The only downside is that you may have to upgrade to the Pro version to truly enjoy all the features.
7. Kapwing
The final little solution on the list is a piece of software called Kapwing.
Compared to all the other options Kapwing has a very interesting proposition with a free forever plan and no watermarks.
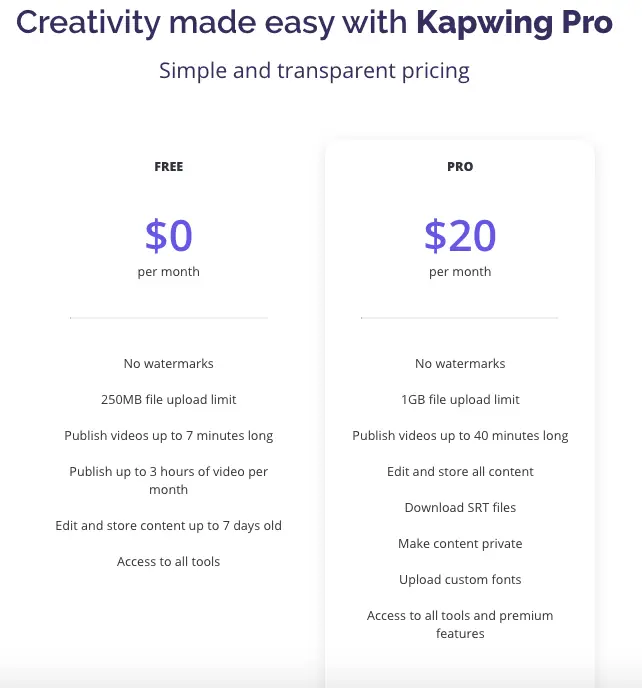
You can publish videos up to 7 minutes in length and the monthly allowance is 3 hours which, in my opinion, is very generous.
It is so simple to get started. Just click the ‘start editing’ button and you are given the option to start from a blank canvas or upload an existing video.
I chose to upload a video. I am brought to this screen to start the editing process.
Here is a list of video sizing options that are available on the Kapwing platform.
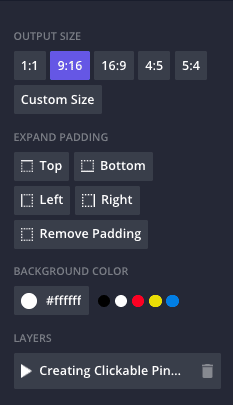
You will like the fact that you can also add your own custom dimensions just like you can with Canva.
I decided to go with a 1000×1500 size video. If you choose this option you will need to click on ‘lock ratio’ for the video to fit into the new canvas size.
Add text on top as the header and head over to the subtitles tab to edit your captions.
Although, the captions may not be 100% accurate, they are still near enough to perfect.
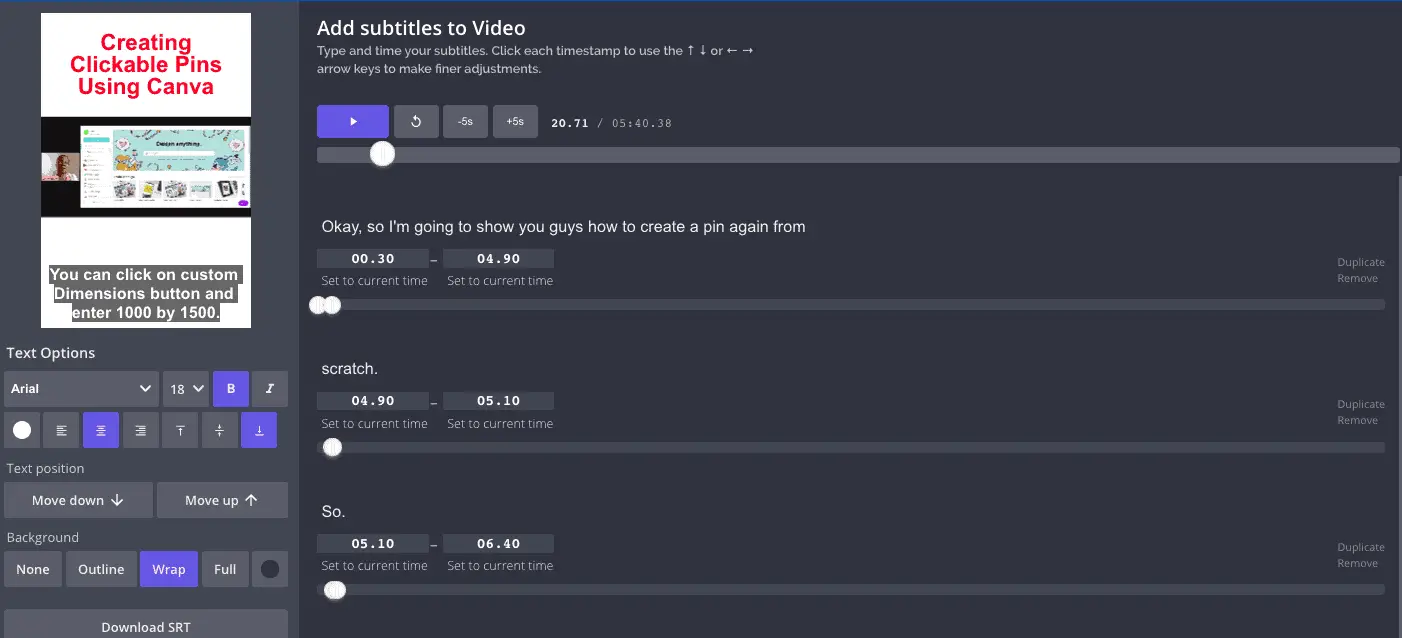
Once you are happy with the captions or subtitles, title text and style of captions (colour + background + location) you can go ahead and download your video.
Here is what mine looks like after the video has been rendered and before I download it.
It gives you the option to download the video as mp4 or you can embed it or copy a link so that you can share it on social media platforms.
The catch here is that the video is now available publicly for everyone to see and that is why they give it to you for free.
Summary
While burning captions or subtitles into your Instagram videos can seem to be a time-consuming process it will be worth it for your viewers.
After all, you are spending a serious amount of time creating your promotional videos.
So, it would make sense to maximise the return on your investment by getting the maximum reach when you add subtitles to your IG videos.
Do remember that Instagram has 5 areas where you can promote your business using video including IG Feed, Stories, Reels, IGTV and IG Live.
While the list of apps to burn subtitles on IG videos is short, do remember that it is not exhaustive so feel free to conduct your own research.
If you need help putting together a content strategy or someone to help you set up a content planning system for your business book some time in my calendar here.
Over to you, what has been your experience when it comes to adding captions to Instagram videos?
Announcements
Remember to subscribe to the Success Unscrambled podcast where you will be the first to hear what’s happening in the entrepreneurial and digital marketing world.
Your positive review of this podcast is vital to keeping it alive and running for the next 12 – 24 months so please leave a positive 5-star review for us on iTunes, Spotify or any of your favourite podcast players.
After a few years in business there’s one thing that stands out to me for those people who become wildly successful.
They go the extra mile in everything they do to create a bigger impact on their community.
I started this blog in 2017 because I had a burden on my heart to reduce women illiteracy globally.
Because this is a huge undertaking I have decided to help 1,000 women over the next 10 years to become wildly successful in their online business through simplified marketing strategies.
That way we can build a strong business network of women who can donate 1% of their profit and together we can help reduce women illiteracy worldwide.
Would you like to be part of this movement? Shoot me an email using alvern (at) successunscrambled (dot) com.


20 thoughts on “Burn Subtitles or Captions for Instagram Videos 7 Ways Automatically [And Why]”
Thank you…lots of helpful info here! I’m going to try AutoCap for my next Instagram story!
Lori, that’s great, it would be awesome to hear how it goes for you.
Thanks so much for featuring Kapwing! I’m one of the developers behind the website, and it’s great to see that it’s helping creative professionals and bloggers build their following on Pinterest and social media 🙂 Let me know if you have any ideas for making the website better!
Julia, it is a pleasure to meet you. I enjoy reviewing amazing apps for marketing on social media as well as project management tools.
Thanks a lot for this helpful post!
You’re welcome Gunel.
Thanks for all this information! I just find it all a time sink. All the platforms require so much work, and for many of us – little reward (as a business). Honestly, I’m spending less and less time and energy on social media and instead focusing on my email list.
Hey Di, you are right it can all feel like a time sink. Focus on what drives revenue for your business.
This is something new to me. Wow! Very interesting! Though I am not an IG person but it seems so many apps will follow this in the future
Michael, you are right captions or subtitles on videos are not exclusive to Instagram.
I DEFINITELY prefer it when videos have subtitles on them! I watch every movie and TV show with subtitles on, too. The latter is due to bad hearing, but for Instagram videos, I like them to have subtitles for when I’m watching them on public. Otherwise I might just have to skip through and miss what they’re saying and that’s always a shame, so having subtitles is definitely beneficial business-wise!
Indya, thanks for that helpful insight. Many of us forget that a number of social media users suffer from physical challenges like hearing.
This is really useful! I was wondering how people were able to create those video captions – and yes, it always seemed like a lot of work!
Nkem, well now you know how to do it. You’ll be a pro in no time at all.
I had recently started sharing videos and yes the results are good and this topic thing works.
Monidipa, that’s great. Thanks for sharing.
how very useful! I absolutely LOVE it, and definitely need it for future
Lyosha, thanks for stopping by.
Great information in this article! I need to make myself do more videos as they really do help garner followers/interaction as you have detailed here.
Autumn, it’s so great that you found the article useful.
Comments are closed.